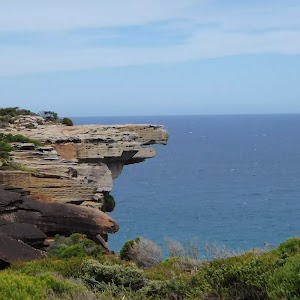
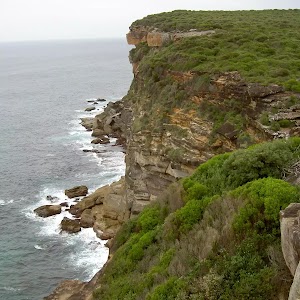
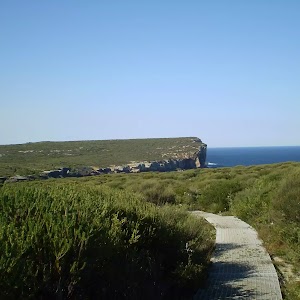
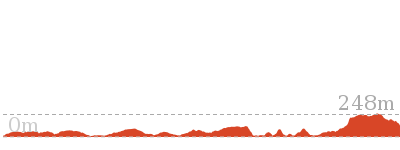
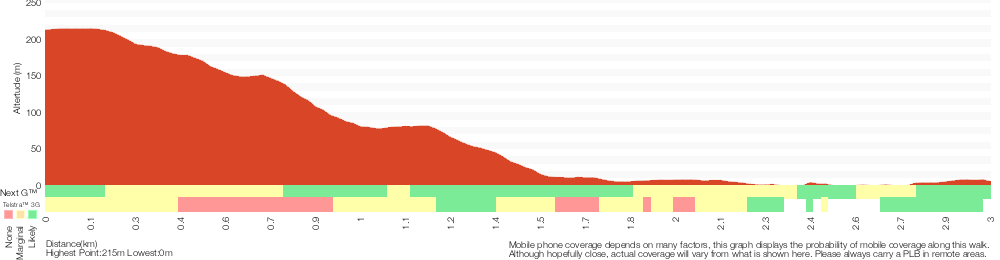
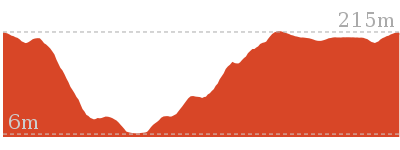
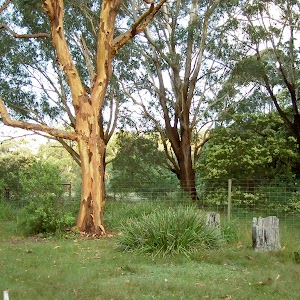
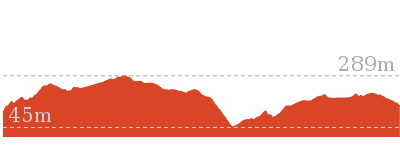
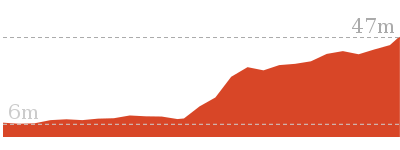
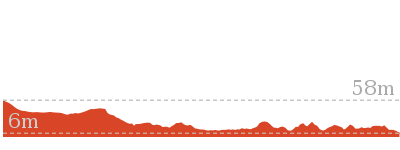
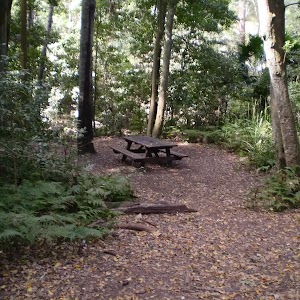
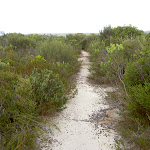
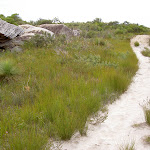
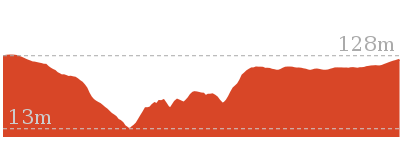
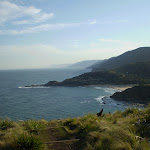
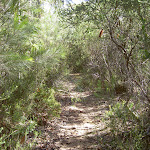
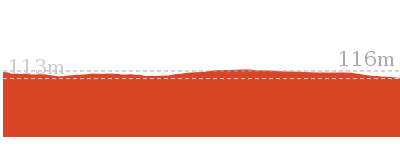
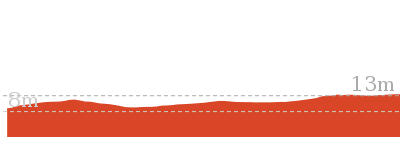
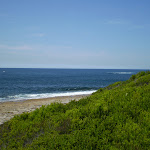
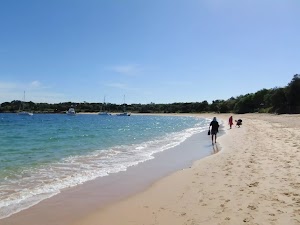
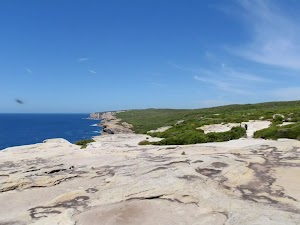
This return walk starts from the southern car park at the Wattamolla picnic area and winds south, further into the Royal National Park. The walk follows the service trail that provides views across the coast and then follows a bush track down into Curracurrang Cove. The cove is a nice narrow nook in the coast line where a number of archaeological findings have been made in the past.
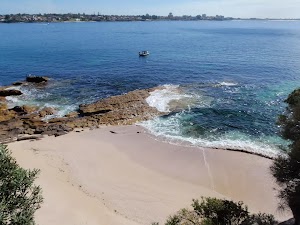
Wattamola picnic area to Curracurrang Cove


1 hr 15 mins
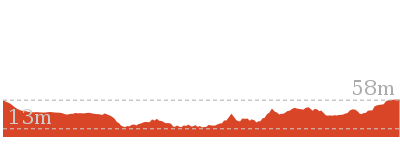
3.1 km Return

91 m
Moderate track


(0km) Wattamolla Picnic Ground Toilet Block → Overflow Carpark

150 m
4 mins
13m
-1m
Easy track
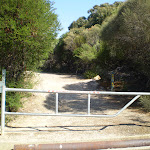
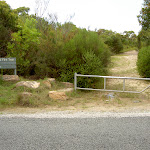
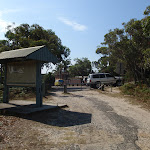
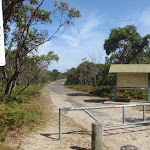
From the toilet block, this walk follows the signs to the Overflow Car Park. (This is the upper car park.) At the back of the car park, this walk comes to an intersection with a large management trail, with a gate and signpost saying ‘Garrie 5.8km’.
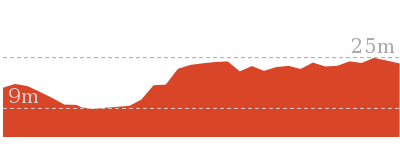
(0.15km) Overflow Carpark → Curracurrang Cove
1.4 km
26 mins
28m
-49m
Moderate track
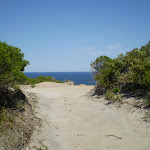
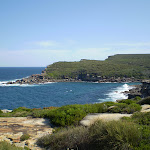
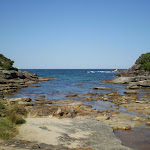
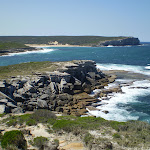
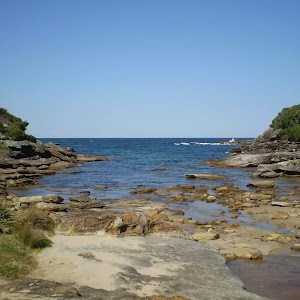
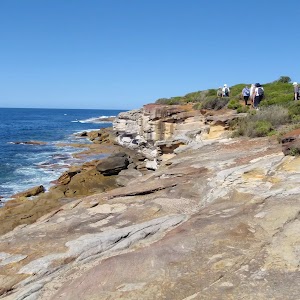
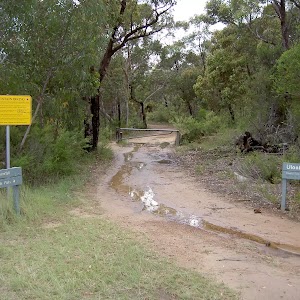
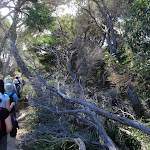
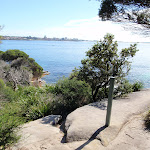
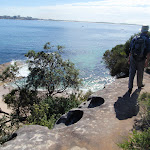
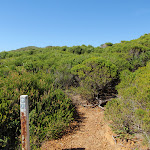
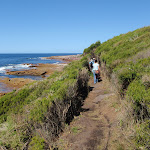
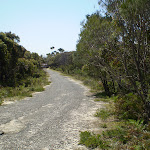
Turn left: From the car park, the walk follows the management trail climbing up the long hill. The walk passes two large water towers as it continues along for a while, before coming to a great lookout over the ocean, marked by a sign saying ‘Curracurrang’. From the lookout, the walk continues along the cliff edge, keeping the ocean to the left as it follows the bush track. The track winds along the coast to Curracurrang Cove, where there is an intersection with another bush track that heads up and away from the ocean.
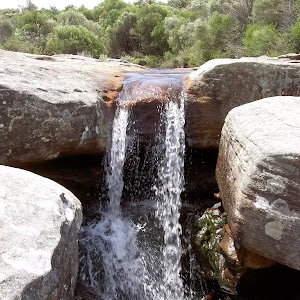
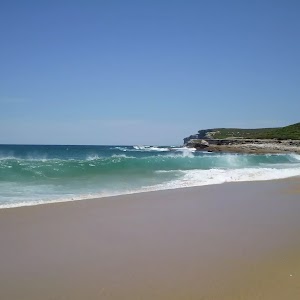
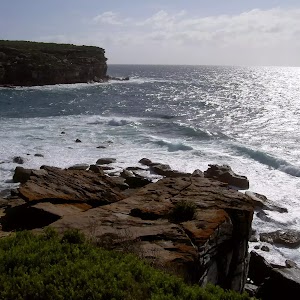
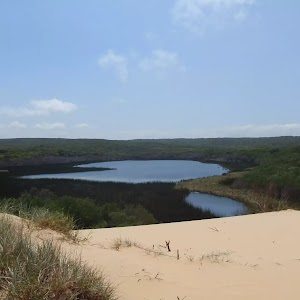
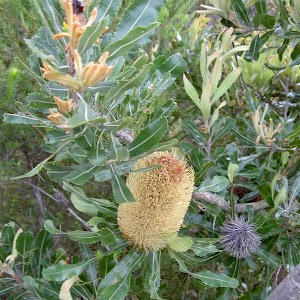
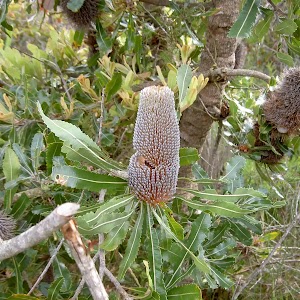
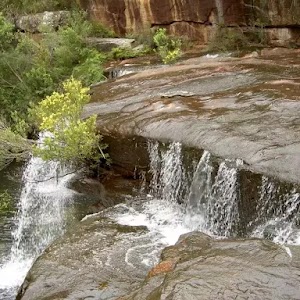
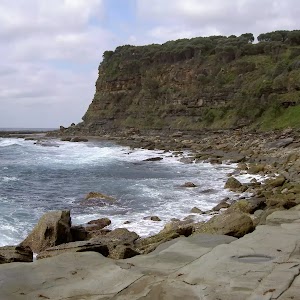
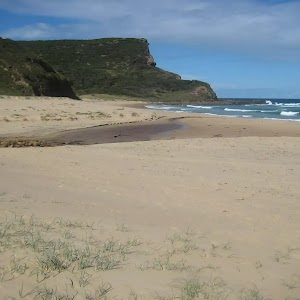
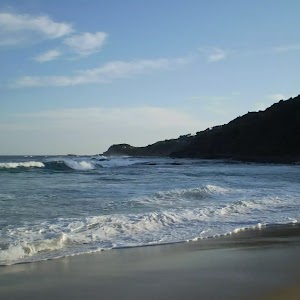
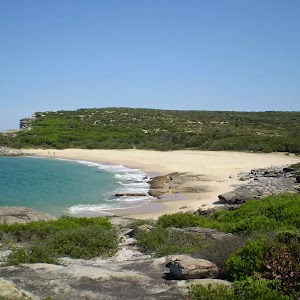
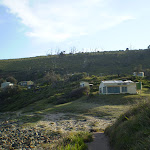
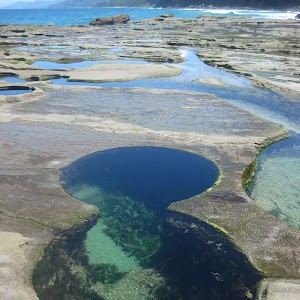
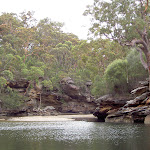
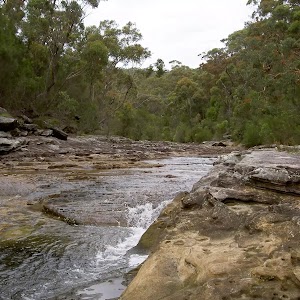
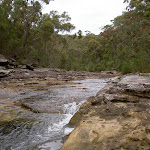
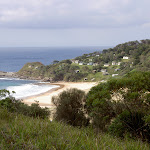
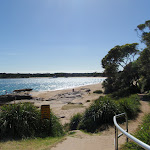
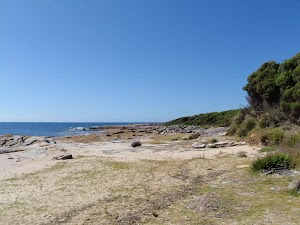
Curracurrang Cove
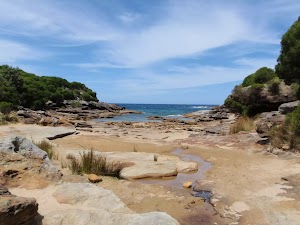
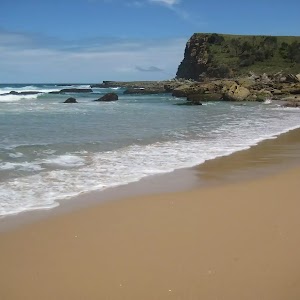
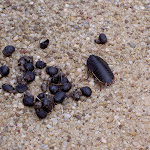
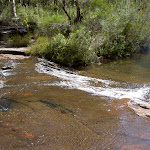
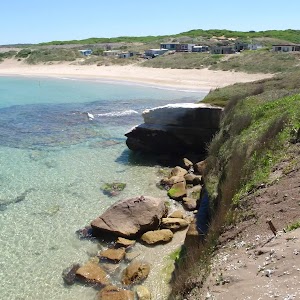
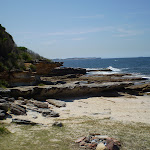
Curracurrang Cove is a small cove about 1km SW of Wattamolla, on the coast of the Royal National Park. The cove faces east and is where Curracurrang Creek meets the ocean. The creek, the cove and the surrounding rocks provide great scenery, making this a relaxing place to stop and enjoy. There is evidence that Aboriginal people lived in this cove. There are a few middens in the area, some rock shelters and Curracurrang creek provides a near-permanent water supply. The cove was first occupied 7500 years ago and was used as a regular campsite by the Dharawal people. More info.
Maps for the Wattamola picnic area to Curracurrang Cove walk
You can download the PDF for this walk to print a map.
These maps below cover the walk and the wider area around the walk, they are worth carrying for safety reasons.
| Otford | 1:25 000 Map Series | 91294S OTFORD | NSW-91294S |
| Port Hacking | 1:100 000 Map Series | 9129 PORT HACKING | 9129 |
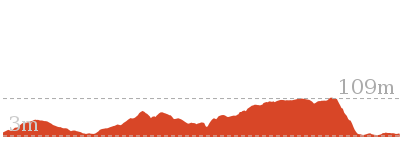
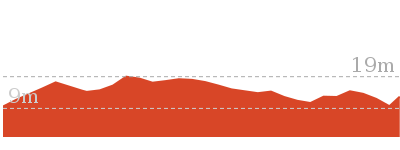
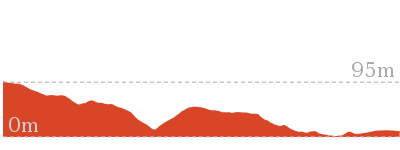
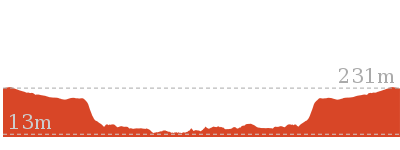
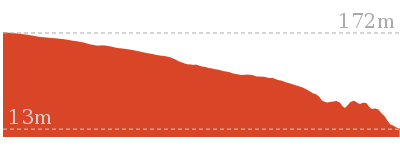
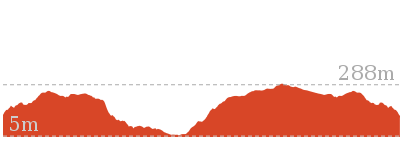
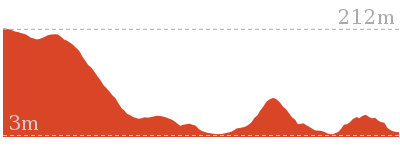
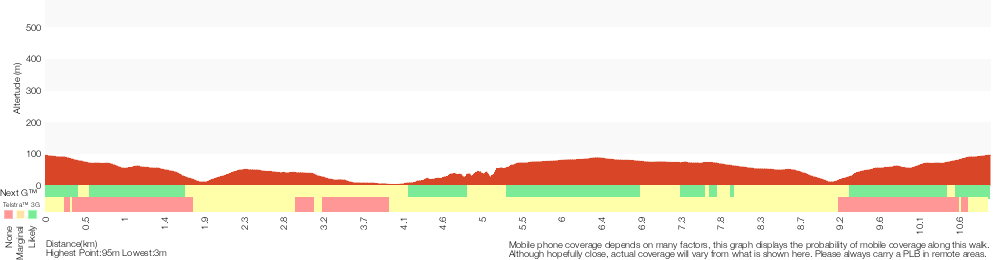
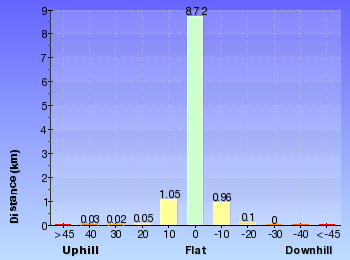
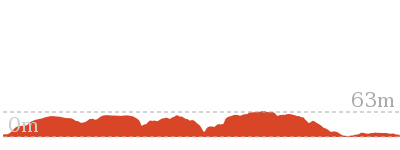
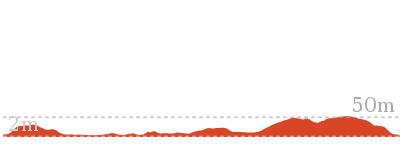
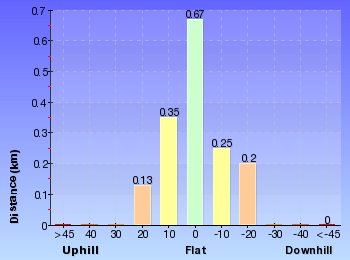
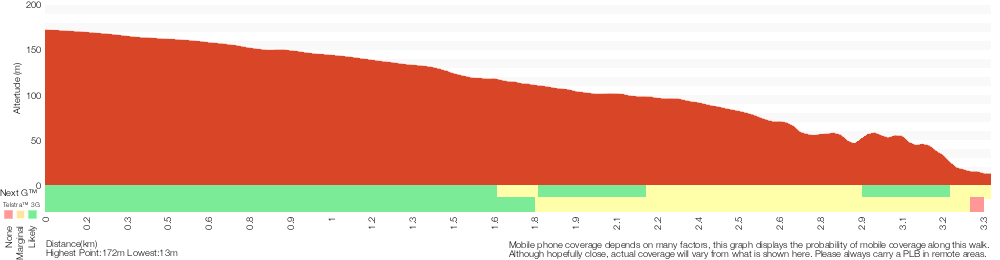
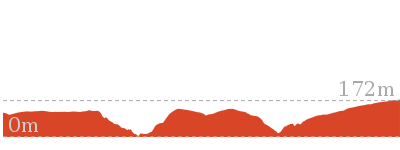
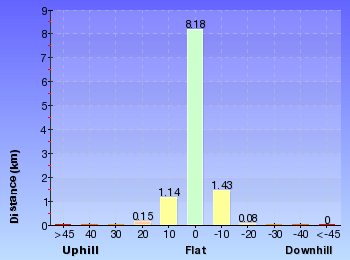
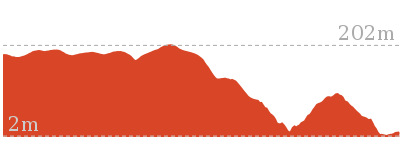
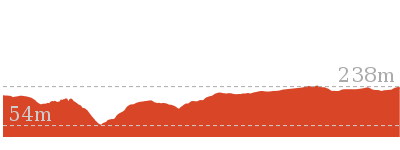
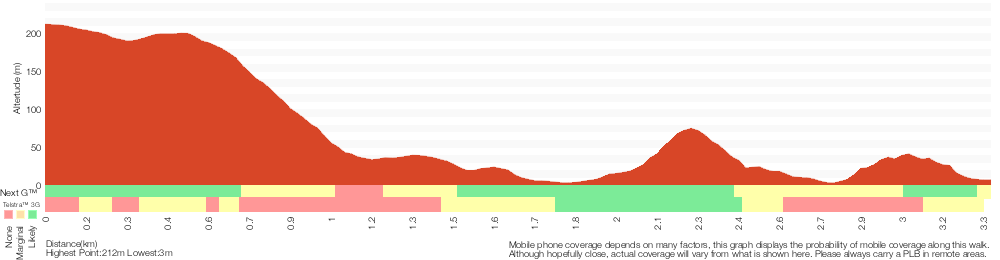
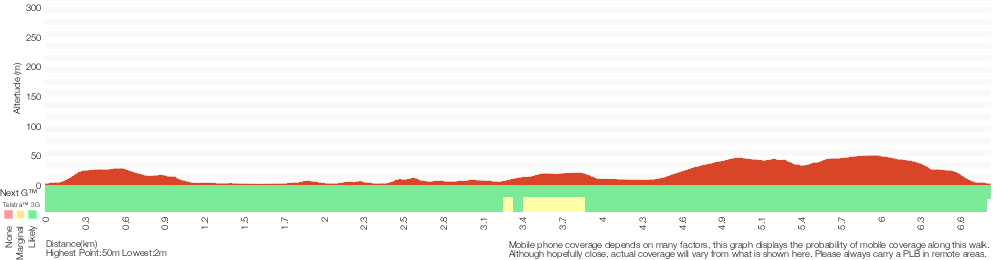
Cross sectional view of the Wattamola picnic area to Curracurrang Cove bushwalking track
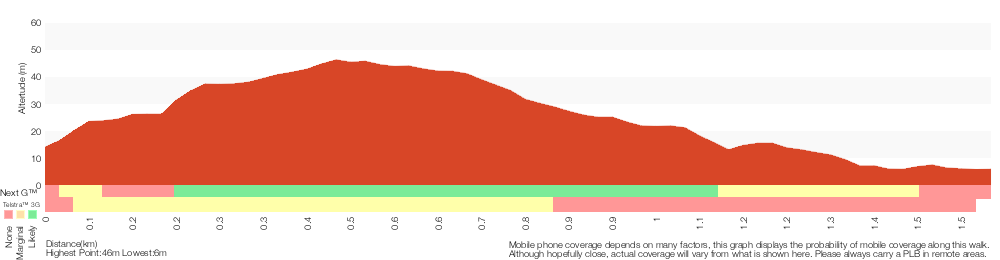
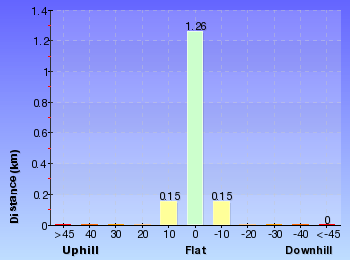
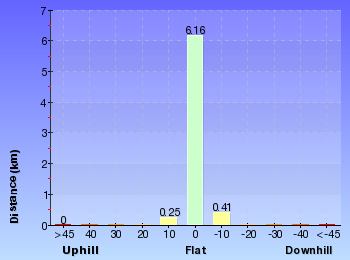
Analysis and summary of the altitude variation on the Wattamola picnic area to Curracurrang Cove
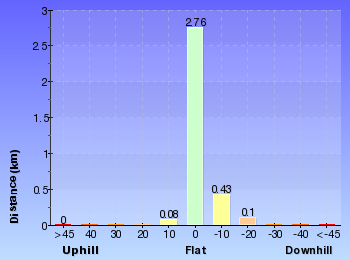
Overview of this walks grade – based on the AS 2156.1 – 2001
Under this standard, a walk is graded based on the most difficult section of the walk.
| Length | 3.1 km | ||
| Time | 1 hr 15 mins | ||
| . | |||
| Grade 3/6 Moderate track |
AS 2156.1 | Gradient | Short steep hills (3/6) |
| Quality of track | Formed track, with some branches and other obstacles (3/6) | ||
| Signs | Clearly signposted (1/6) | ||
| Experience Required | No experience required (1/6) | ||
| Weather | Weather generally has little impact on safety (1/6) | ||
| Infrastructure | Generally useful facilities (such as fenced cliffs and seats) (1/6) |
Some more details of this walks Grading
Here is a bit more details explaining grading looking at sections of the walk
Gradient
Around 1.4km of this walk has short steep hills, whilst the remaining 150m has gentle hills with occasional steps.
Quality of track
Around 1.4km of this walk follows a formed track, with some branches and other obstacles, whilst the remaining 150m follows a smooth and hardened path.
Signs
This whole walk, 1.6km is clearly signposted.
Experience Required
This whole walk, 1.6km requires no previous bushwalking experience.
weather
This whole walk, 1.6km is not usually affected by severe weather events (that would unexpectedly impact safety and navigation).
Infrastructure
This whole walk, 1.6km is close to useful facilities (such as fenced cliffs and seats).
Similar walks
A list of walks that share part of the track with the Wattamola picnic area to Curracurrang Cove walk.
7.4 km Return
3 hrs
Moderate track

7.6 km One way
3 hrs 30 mins
Hard track
13.3 km One way
5 hrs
Hard track


27.4 km One way
2 Days
Hard track

27.4 km One way
2 Days
Hard track
Other Nearby walks
A list of walks that start near the Wattamola picnic area to Curracurrang Cove walk.
1.7 km Return
45 mins
Moderate track
10.4 km Circuit
4 hrs
Moderate track

1.6 km Return
45 mins
Easy track
4.1 km One way
1 hr 30 mins
Moderate track
9.7 km Return
3 hrs 30 mins
Hard track

3.8 km Return
1 hr 30 mins
Hard track
11 km Circuit
4 hrs 30 mins
Hard track

4.7 km One way
1 hr 45 mins
Moderate track

11.8 km Return
4 hrs 30 mins
Hard track

12.5 km Circuit
4 hrs 30 mins
Moderate track
6.7 km Return
2 hrs 30 mins
Hard track
294 m Return
15 mins
Moderate track

Plan your trip to and from the walk here
The Wattamola picnic area to Curracurrang Cove walk starts and ends at the Wattamolla Picnic Ground Toilet Block (gps: -34.138377, 151.11485)
Your main transport option to Wattamolla Picnic Ground Toilet Block is by;
![]() Car. There is free parking available.
Car. There is free parking available.
(get details)


Short URL = http://wild.tl/wpatcc
Gallery images
There are other downloads I am still working on.
You will probably need to login to access these — still all free.
* KML (google earth file)
* GPX (GPS file)
Special Maps/ brochures
* A3 topo maps
* PDF with Lands Topo map base
* PDF with arial image (and map overlay)
I wanted to get the main site live first, this extra stuff will come in time.
Happy walking
Matt 🙂
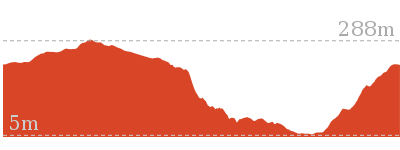
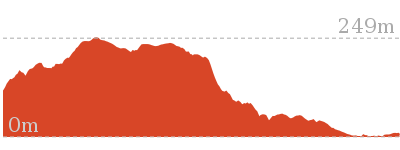
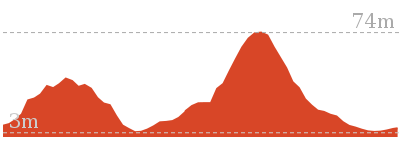
Garawarra Farm carpark to figure eight pools

2 hrs 30 mins
6 km Return
273 m
Hard track
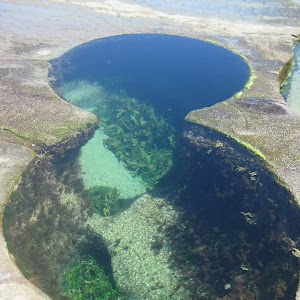
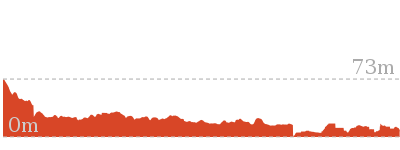
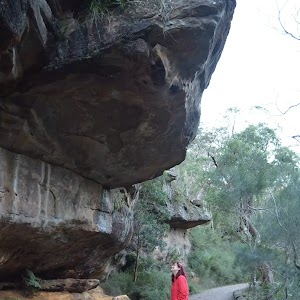
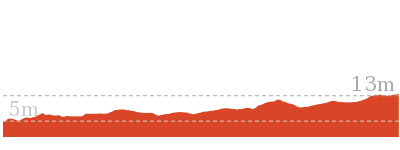
This return walk starts from the old Garawarra Farm car park and heads down the ridge through the Royal National Park, to the coast. The walk then follows the coast, through Burning Palms beach, and around the base of the headland to the famous Figure Eight Pools. This walk explores 4 distinct environments and gives a great cross section of what the park has to offer. The Figure Eight pools are on an ocean rock platform. Rock platforms can be very dangerous places, especially at high tide and during high seas. Only plan to visit the rock platform at low tide and low seas (see BOM website for forecast). Please also wear appropriate footwear for the walk and rock platforms.
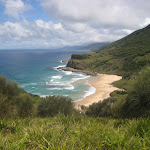


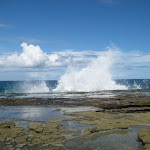

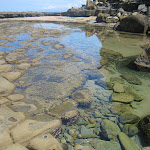

Figure Eight Pools Safety

The Figure Eight Pools have become very popular. Many people visiting the area are not well prepared and placing themselves and others in danger.
Please ensure you have enclosed and strudy shoes (thongs are not enough). There are no public facilities on the walk, please carry plenty of water, food and other surplies needed. Wear approriate clothes for the walk.
It is very very important that you only plan to visit the rock platform at low tide (check tides at http://www.bom.gov.au/australia/tides/#!/nsw-port-kembla)
It is also very very important to ensure the sea&swell forecast is 1.5m or less (http://www.bom.gov.au/australia/charts/viewer/index.shtml?type=sigWaveHgt&tz=AEDT&area=SEAu&model=WR
Even in perfect forecast conditions, always keep an eye on the sea (never turn your back to the ocean) and stay well back from the ocean edge of the rock platform.
Diving and jumping in any rock pools is likely to cause serious injury. Mobile phone reception is very limited on the walk and not available all the way.
Please watch this video and read the article to better understand the risks. http://bit.ly/1kZ3AbM.
Stay safe and have fun.
(0km) Garawarra Farm Carpark → The Squeeze Way and Burgh Ridge track
90 m
1 mins
2m
0m
Easy track
From the Garawarra Farm car park, this walk heads east out of the car park to turn right onto the main dirt road (that leads into the car park). A short distance down the road this walk comes to an intersection just beyond the locked gate marked with a ‘Coast Walk’ and a ‘Garawarra Ridge Management Trail’[1] signpost.
(0.09km) The Squeeze Way and Burgh Ridge track → Int of Burgh Ridge Track and Era Track (West)
970 m
23 mins
8m
-144m
Moderate track
Continue straight: From the intersection, this walk follows the Burning Palms, Era and Garie arrows on the Coast Walk signpost, winding along the bush track and down the long hill. The track gradually steepens and becomes a little rougher, winding down onto the ridge line and all the way along, until it breaks out of the trees and continues down through the short scrub and blade grass to the intersection of the bush track on the left.
(1.06km) Int of Burgh Ridge Track and Era Track (West) → Int of Coast Track and Burgh Ridge Track (Sth)
110 m
2 mins
4m
0m
Moderate track
Continue straight: From the intersection, this walk follows the bush track heading towards the ocean, following the ridgeline to the signposted intersection of the ‘Coast Walk’.
(1.17km) Int of Coast Track and Burgh Ridge Track (Sth) → Burning Palms Beach (southern end)
940 m
18 mins
4m
-79m
Moderate track
Veer right: From the intersection, this walk follows the sign to ‘Burning Palms’ along the bush track, winding down the side of the hill, past the cabins, then at the bottom the track joins onto a metal walkway that soon changes to a narrow bush track. This passes behind Burning Palms Beach until coming to a sign saying ‘Otford via Palm Jungle’.
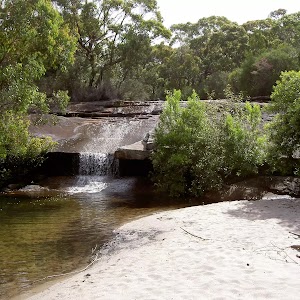
(2.11km) Burning Palms Beach (southern end) → Figure 8 Pools
900 m
16 mins
15m
-17m
Hard track
Veer left: (only to be attempted at low tide and low swell)
From the beach, this walk follows the rocky passage beneath the rocky headland (keeping the headland to the right). The walk rounds the first prominent headland to a creek that drops off the cliffs above. This walk heads out onto a second prominent headland to the Figure 8 Pools. There are a number of Figure 8-shaped pools, but one main one. The pools are towards the sea, in line with the gully.
From the beach, this walk follows the rocky passage beneath the rocky headland (keeping the headland to the right). The walk rounds the first prominent headland to a creek that drops off the cliffs above. This walk heads out onto a second prominent headland to the Figure 8 Pools. There are a number of Figure 8-shaped pools, but one main one. The pools are towards the sea, in line with the gully.
Figure Eight Pools
The Figure Eight Pools are on the rock shelf, south of Figure Eight Pools gully, near Burning Palms. There are a number of circular sinkholes in the rock, and a few of them have joined over time to form a figure ‘8’ shape. Two sink holes in particular have joined to form a very spectacular figure ‘8’ shape in the rock. The safest time to visit the pools is at low tide when there is only a very low swell in the ocean.
Maps for the Garawarra Farm carpark to figure eight pools walk
You can download the PDF for this walk to print a map.
These maps below cover the walk and the wider area around the walk, they are worth carrying for safety reasons.
| Otford | 1:25 000 Map Series | 91294S OTFORD | NSW-91294S |
| Port Hacking | 1:100 000 Map Series | 9129 PORT HACKING | 9129 |
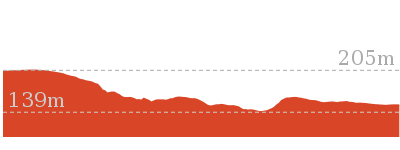
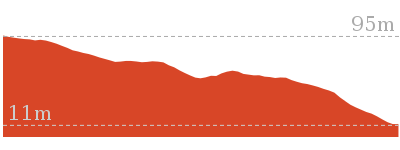
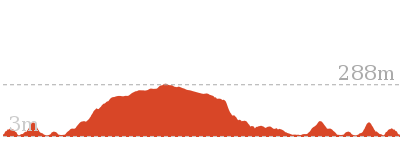
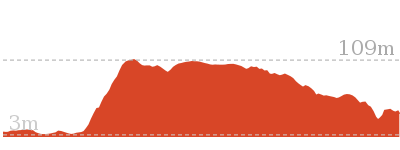
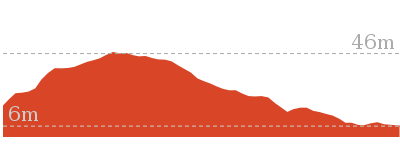
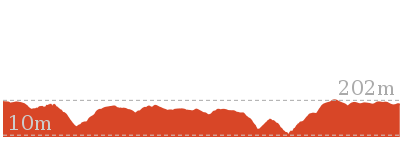
Cross sectional view of the Garawarra Farm carpark to figure eight pools bushwalking track
Analysis and summary of the altitude variation on the Garawarra Farm carpark to figure eight pools
Overview of this walks grade – based on the AS 2156.1 – 2001
Under this standard, a walk is graded based on the most difficult section of the walk.
| Length | 6 km | ||
| Time | 2 hrs 30 mins | ||
| . | |||
| Grade 4/6 Hard track |
AS 2156.1 | Gradient | Short steep hills (3/6) |
| Quality of track | Rough track, where fallen trees and other obstacles are likely (4/6) | ||
| Signs | Minimal directional signs (4/6) | ||
| Experience Required | Some bushwalking experience recommended (3/6) | ||
| Weather | Storms may impact on navigation and safety (3/6) | ||
| Infrastructure | Limited facilities (such as cliffs not fenced, significant creeks not bridged) (4/6) |
Some more details of this walks Grading
Here is a bit more details explaining grading looking at sections of the walk
Gradient
Around 2.8km of this walk has short steep hills, whilst the remaining 200m is flat with no steps.
Quality of track
1.9km of this walk follows a formed track, with some branches and other obstacles and another 900m follows a rough track, where fallen trees and other obstacles are likely. The remaining (200m) follows a clear and well formed track or trail.
Signs
1.1km of this walk is clearly signposted and another 970m has directional signs at most intersection. The remaining (900m) has minimal directional signs.
Experience Required
Around 1.9km of this walk requires some bushwalking experience, whilst the remaining 1.1km requires no previous bushwalking experience.
weather
Around 2.1km of this walk is not usually affected by severe weather events (that would unexpectedly impact safety and navigation), whilst the remaining 900m is affected by storms that may impact your navigation and safety.
Infrastructure
2km of this walk has limited facilities (such as not all cliffs fenced) and another 900m has limited facilities (such as cliffs not fenced, significant creeks not bridged). The remaining (85m) is close to useful facilities (such as fenced cliffs and seats).
Similar walks
A list of walks that share part of the track with the Garawarra Farm carpark to figure eight pools walk.
3.9 km One way
2 hrs
Moderate track


5 km Circuit
2 hrs 15 mins
Hard track
8.2 km Circuit
3 hrs 30 mins
Hard track

11 km One way
4 hrs 30 mins
Hard track
12.9 km One way
5 hrs 15 mins
Hard track
13.2 km Return
6 hrs 30 mins
Hard track
13.4 km Circuit
6 hrs
Hard track
13.5 km Circuit
7 hrs
Hard track
27.4 km One way
2 Days
Hard track
27.4 km One way
2 Days
Hard track
Other Nearby walks
A list of walks that start near the Garawarra Farm carpark to figure eight pools walk.
3.3 km One way
1 hr 45 mins
Hard track
7.7 km Return
3 hrs
Hard track
1.3 km Return
45 mins
Moderate track
3.2 km Return
2 hrs
Moderate track
4.4 km One way
1 hr 45 mins
Hard track


9.2 km Circuit
3 hrs 30 mins
Hard track

8.9 km Return
3 hrs 30 mins
Moderate track

9.7 km One way
3 hrs 45 mins
Moderate track
5.1 km Return
2 hrs
Hard track
4.4 km Circuit
1 hr 45 mins
Moderate track
4.7 km One way
1 hr 45 mins
Moderate track
11.8 km Return
4 hrs 30 mins
Hard track
Plan your trip to and from the walk here
The Garawarra Farm carpark to figure eight pools walk starts and ends at the Garawarra Farm Carpark (gps: -34.180069, 151.03931)
Your main transport option to Garawarra Farm Carpark is by;
![]() Car. A park entry fee is required for driving into the park.
Car. A park entry fee is required for driving into the park.
(get details)
Short URL = http://wild.tl/gfctfep
Gallery images
There are other downloads I am still working on.
You will probably need to login to access these — still all free.
* KML (google earth file)
* GPX (GPS file)
Special Maps/ brochures
* A3 topo maps
* PDF with Lands Topo map base
* PDF with arial image (and map overlay)
I wanted to get the main site live first, this extra stuff will come in time.
Happy walking
Matt 🙂
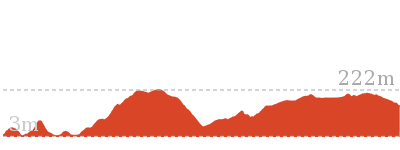
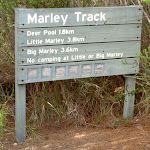
Marley Track
And Walk
Marley Track

4 hrs 30 mins
11 km Circuit
353 m
Hard track
This walk takes you down from the ridge to the quiet Deer Pool on Marley Creek. You pass the Big and Little Marley beaches, with an optional side trip to Wattamola Dam. This side trip is well worth it on a hot day to take a dip. The walk then leads away from the coast to loop back to the starting point on Bundeena Drive.


(0km) Int. Marley Trk and Bundeena Drive → Deer Pools Clearing
1.9 km
38 mins
13m
-96m
Hard track
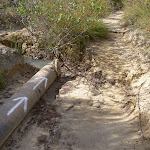
From the car park on the northern side of Bundeena Drive (1.7km east of Mainbar Rd), this walk crosses the road and heads into the bush between the two posts, following the arrow. Soon the track pass the ‘Marley Track’ sign and starts to head downhill. The track continues past the old concrete pipe (with white spray-painted arrows). The track passes a couple of rock platforms, but generally the track is narrow as it winds down the hill. Near Deer Pools, there is a clearing on the left as the track tends right, towards the waterfall. The track passes over the top of the waterfall to head up to a clearing on the other side.
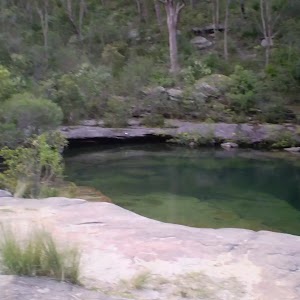
Deer Pool

Deer Pool, Royal National Park, is a small and picturesque set of falls that run into a pool with a sandy bank. The waterfall is fed by Marley Creek which continues its journey into Marley Lagoon, behind Big Marley Beach. Royal National Park was once home to many deer, who used to frequent these pools. This is a relaxing spot on a warm day, with the opportunity for a dip or a gentle massage in the cascade. Although a sign suggests camping is permitted by permit, permits are not issued for camping here.
(1.88km) Deer Pools Clearing → Int. Mowlee Ridge Trail and Marley Trk
560 m
11 mins
41m
-3m
Hard track
Continue straight: From the clearing, this walk leads south-east up the hill through dense scrub. The track follows sprayed white dashes on the rocks, heading up the hill to pass a rocky platform (on the left of the track) approximately 300m up. The track continues past the rocky platform for approximately 100m to the intersection on the ridgeline.
(2.44km) Int. Mowlee Ridge Trail and Marley Trk → North end of Chimney Trk
1 km
18 mins
7m
-38m
Moderate track
Turn left: From the intersection, this walk follows the service trail, heading down the long gentle hill as it steadily winds down to the coast. There are views across Marley Lagoon on the left as the walk heads down to the end of the service trail, where it comes to a grassy clearing with a bush track on the other side.
(3.47km) North end of Chimney Trk → Int. Coastal Trk and Chimney Trk
120 m
2 mins
0m
-9m
Moderate track
Continue straight: From the intersection, this walk follows the ‘Marley’ arrow up the short hill and over the rock platform, continuing along the defined bush track, winding down to the coast where it comes to the ‘T’ intersection with the Coast Walk bush track.
(3.59km) Int. Coastal Trk and Chimney Trk → West Marley Beach
240 m
4 mins
4m
-4m
Moderate track
Turn left: From the intersection, this walk follows the bush track along the coast, keeping the ocean to the right for a short while before the track descends steeply off the rock-shelf and down a rough bush track to the end of Marley Beach. At the end of this side trip, retrace your steps back to the main walk then Veer left.
Big Marley Beach

Big Marley Beach, Royal National Park, is a yellow sand, crescent-shaped beach, approximately 400m in length. The beach has a large dune area, behind which Marley Lagoon is found. The lagoon is fed by Marley Creek and the surrounding catchment. The beach is not patrolled and there are no other facilities. The south-facing beach has a rockshelf at either end. For information on this beach’s pollution levels, follow the ‘more info’ link. More info.
(3.59km) Int. Coastal Trk and Chimney Trk → Little Marley Beach
440 m
8 mins
5m
-11m
Moderate track
Veer right: From the intersection, this walk follows the bush track winding along the coast, keeping the ocean and the cliffs to the left. The track winds down the hill for a while before coming to the end of Little Marley Beach.
Little Marley Beach
Little Marley Beach, Royal National Park, is a yellow sand beach, approximately 140m long. The narrow beach faces north-east and has a rock platform at either end. The beach is not patrolled and has no other services. For information on this beach’s pollution levels, follow the ‘more info’ link below. More info.
(4.03km) Little Marley Beach → Int. Coastal Trk NE of Wattamolla Ck
2.1 km
54 mins
174m
-96m
Moderate track
Continue straight: From Little Marley Beach, this walk follows the coast across the beach, keeping the ocean to the left as it climbs up the signposted bush track at the end to the clifftop. From here, the track follows the coast line for a short period before passing over numerous sections of metal footbridge. This continues through the scrub vegetation, with short periods where the track comes back onto the rockshelf above the cliff, until the track changes to purely being a well-managed bush track through the high scrub, as it winds along to the signposted intersection of the Coast Track.
Wattamolla Dam

Wattamolla pool (or dam), Royal National Park, is a small water hole on Wattamolla Creek, above the lagoon. The pool is on the Coast Track near Wattamolla picnic area and offers a quiet spot for a dip and a rest. The pool is formed by a small, constructed sandstone dam and fed by a small waterfall above.
(6.12km) Int. Coastal Trk NE of Wattamolla Ck → Int. Mowlee Ridge Trail and Marley Trk
2.4 km
40 mins
14m
-47m
Moderate track
Veer right: From the intersection, this walk heads north-west down the spur, with the spur on the right of the track. The track then descends onto the saddle and continues north-west through the thick wall of scrub on either side, to the ‘T’ intersection approximately 400m down the hill.
Turn right: From the intersection, this walk follows the management trail heading east, meandering through the thick green scrub over a number of small bumps (used for water diversion) as the track winds towards the coast. After a while, the management trail comes to the signposted intersection of the ‘Deer Pool’ bush track.
Turn right: From the intersection, this walk follows the management trail heading east, meandering through the thick green scrub over a number of small bumps (used for water diversion) as the track winds towards the coast. After a while, the management trail comes to the signposted intersection of the ‘Deer Pool’ bush track.
(8.51km) Int. Mowlee Ridge Trail and Marley Trk → Int. Marley Trk and Bundeena Drive
2.4 km
49 mins
99m
-54m
Hard track
Turn left: From the intersection, this walk heads north-west along the flat trail which runs through the scrub. The track continues for approximately 100m, then begins to descend after passing a rockshelf on the right. The track continues for approximately 300m, following the sprayed white dashes through the dense scrub and coming to a clearing.
Continue straight: From the clearing, this walk heads across the top of the waterfall, then follows the arrow on the sign across the creek on top of the waterfall to the other side. The track passes a clearing on the right as it continues up the hill, following the sprayed white dashes up the hill. The rather narrow track leads up the hill to the road, crossing a few rock platforms. The road is found about 350 meters past the old pipe with white spray-painted arrows. There is a ‘Marley Track’ sign just before Bundeena Drive, and a car park on the other side of the road (1.7km east of Mainbar Rd).
Continue straight: From the clearing, this walk heads across the top of the waterfall, then follows the arrow on the sign across the creek on top of the waterfall to the other side. The track passes a clearing on the right as it continues up the hill, following the sprayed white dashes up the hill. The rather narrow track leads up the hill to the road, crossing a few rock platforms. The road is found about 350 meters past the old pipe with white spray-painted arrows. There is a ‘Marley Track’ sign just before Bundeena Drive, and a car park on the other side of the road (1.7km east of Mainbar Rd).
Maps for the Marley Track walk
You can download the PDF for this walk to print a map.
These maps below cover the walk and the wider area around the walk, they are worth carrying for safety reasons.
| Otford | 1:25 000 Map Series | 91294S OTFORD | NSW-91294S |
| Port Hacking | 1:25 000 Map Series | 91294N PORT HACKING | NSW-91294N |
| Port Hacking | 1:100 000 Map Series | 9129 PORT HACKING | 9129 |
Cross sectional view of the Marley Track bushwalking track
Analysis and summary of the altitude variation on the Marley Track
Overview of this walks grade – based on the AS 2156.1 – 2001
Under this standard, a walk is graded based on the most difficult section of the walk.
| Length | 11 km | ||
| Time | 4 hrs 30 mins | ||
| . | |||
| Grade 4/6 Hard track |
AS 2156.1 | Gradient | Short steep hills (3/6) |
| Quality of track | Formed track, with some branches and other obstacles (3/6) | ||
| Signs | Minimal directional signs (4/6) | ||
| Experience Required | Some bushwalking experience recommended (3/6) | ||
| Weather | Storms may impact on navigation and safety (3/6) | ||
| Infrastructure | Limited facilities (such as cliffs not fenced, significant creeks not bridged) (4/6) |
Some more details of this walks Grading
Here is a bit more details explaining grading looking at sections of the walk
Gradient
7km of this walk has short steep hills and another 3.5km has gentle hills with occasional steps. The remaining (440m) is flat with no steps.
Quality of track
Around 7km of this walk follows a formed track, with some branches and other obstacles, whilst the remaining 3.9km follows a clear and well formed track or trail.
Signs
4.9km of this walk has minimal directional signs and another 4km has directional signs at most intersection. The remaining (2.1km) is clearly signposted.
Experience Required
Around 9km of this walk requires no previous bushwalking experience, whilst the remaining 1.6km requires some bushwalking experience.
weather
Around 7km of this walk is not usually affected by severe weather events (that would unexpectedly impact safety and navigation), whilst the remaining 3.8km is affected by storms that may impact your navigation and safety.
Infrastructure
Around 6km of this walk has limited facilities (such as not all cliffs fenced), whilst the remaining 4.9km has limited facilities (such as cliffs not fenced, significant creeks not bridged).
Similar walks
A list of walks that share part of the track with the Marley Track walk.
3.8 km Return
1 hr 30 mins
Hard track
9.7 km Return
3 hrs 30 mins
Hard track
10.4 km Circuit
4 hrs
Moderate track
13.3 km One way
5 hrs
Hard track
14 km Return
5 hrs
Moderate track
27.4 km One way
2 Days
Hard track
27.4 km One way
2 Days
Hard track
Other Nearby walks
A list of walks that start near the Marley Track walk.
6.7 km Return
2 hrs 30 mins
Hard track
7.4 km Return
3 hrs
Moderate track
1.6 km Return
45 mins
Easy track
7.6 km One way
3 hrs 30 mins
Hard track
1.7 km Return
45 mins
Moderate track
3.1 km Return
1 hr 15 mins
Moderate track
294 m Return
15 mins
Moderate track
6.8 km Circuit
2 hrs 30 mins
Moderate track
5.1 km Circuit
1 hr 45 mins
Moderate track

12.7 km Return
4 hrs 30 mins
Moderate track
10.8 km Circuit
3 hrs 20 mins
Moderate track
4.4 km One way
2 hrs
Hard track
Plan your trip to and from the walk here
The Marley Track walk starts and ends at the Int. Marley Trk and Bundeena Drive (gps: -34.103046, 151.11575)
Your main transport option to Int. Marley Trk and Bundeena Drive is by;
![]() Car. There is free parking available.
Car. There is free parking available.
(get details)
Short URL = http://wild.tl/19
Gallery images
There are other downloads I am still working on.
You will probably need to login to access these — still all free.
* KML (google earth file)
* GPX (GPS file)
Special Maps/ brochures
* A3 topo maps
* PDF with Lands Topo map base
* PDF with arial image (and map overlay)
I wanted to get the main site live first, this extra stuff will come in time.
Happy walking
Matt 🙂
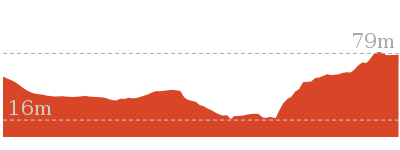
Garie Beach to North Era Beach
And Walk
Garie Beach to North Era Beach

2 hrs
3.2 km Return
242 m
Moderate track
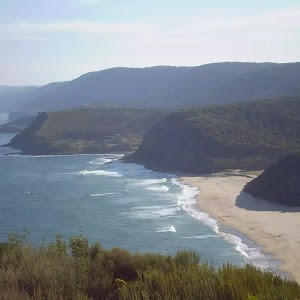
This walk is the shortest walk to North Era Beach and starts from the Garie car park. Both beaches are popular surfing beaches, and have either camping or basic hostel accommodation. This makes the walk between the beaches an excellent way to transport boards and supplies for your surf retreat, weekend getaway or just a nice stroll during the day.

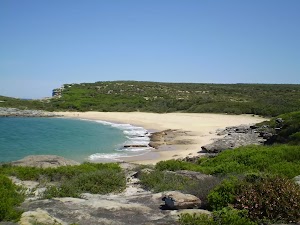
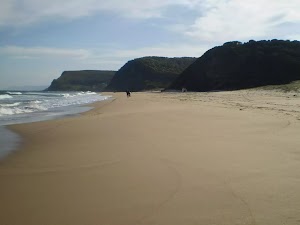
Garie Beach
Garie Beach, Royal National Park, is a large, south-east facing, yellow sand beach. The beach is backed by steep headlands and gullies. There is a large car park at the end of Garie Rd for access to the beach. Garie Beach is popular for surfing, patrolled 9am-5pm from December to January. Facilities include toilets, kiosk, picnic tables, cold showers and Surf Life Saving Club. The water from the shower should be treated before drinking, this water comes from a tank and may be unavailable during dry periods. More info.
(0km) Garie Beach Car Park → Little Garie
750 m
20 mins
59m
-47m
Moderate track
From the Garie Beach car park, the walk follows the sign to ‘North Era’, keeping the sea to the left. This track follows the base of the large grassy hill between the rocks and the ocean, to the Little Garie cabins and up past the Little Garie Community Hall.
(0.75km) Little Garie → North Era Bush Campground
850 m
23 mins
62m
-74m
Moderate track
Continue straight: From the community hall in Little Garie, the walk heads steeply up the hill, following the track to the south-west. To prevent erosion of the hill, wooden steps have been installed. From the top of the ridge, the track continues down the other side, keeping the ocean on the left while winding down into North Era Bush Campground.
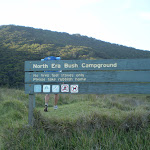
North Era camping ground
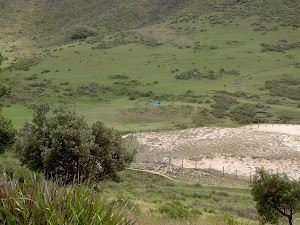
North Era camping ground, Royal National Park, is a large dune area situated directly behind North Era Beach. This camping spot is popular with surfers, and it also has a toilet and a cleared area to pitch your tent. A maximum of 36 people (12 sites) can camp here, so there is plenty of room for everyone. Open fires are not permitted, you can carry a fuel stove for cooking. A camping permit is required from NPWS before arriving (Phone:(02) 9542 068). Water is often available from the creek (treat before drinking), If dry you can walk to Garie Beach for water, although the water here may also be dried up, during a dry period it is best to carry all your water with you.
Maps for the Garie Beach to North Era Beach walk
You can download the PDF for this walk to print a map.
These maps below cover the walk and the wider area around the walk, they are worth carrying for safety reasons.
| Otford | 1:25 000 Map Series | 91294S OTFORD | NSW-91294S |
| Port Hacking | 1:100 000 Map Series | 9129 PORT HACKING | 9129 |
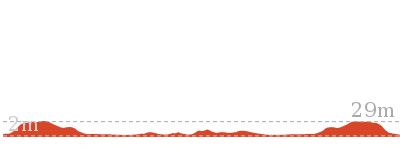
Cross sectional view of the Garie Beach to North Era Beach bushwalking track
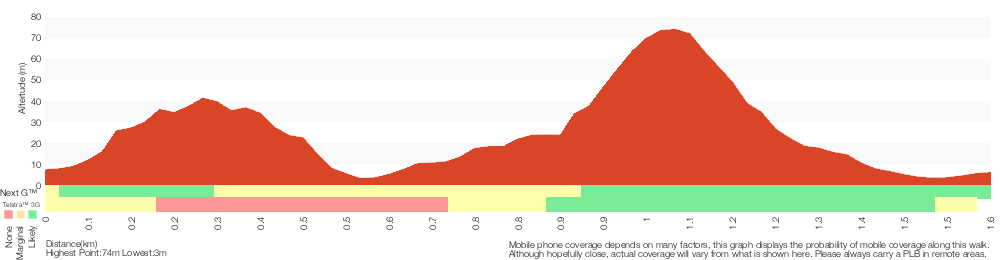
Analysis and summary of the altitude variation on the Garie Beach to North Era Beach
Overview of this walks grade – based on the AS 2156.1 – 2001
Under this standard, a walk is graded based on the most difficult section of the walk.
| Length | 3.2 km | ||
| Time | 2 hrs | ||
| . | |||
| Grade 3/6 Moderate track |
AS 2156.1 | Gradient | Short steep hills (3/6) |
| Quality of track | Formed track, with some branches and other obstacles (3/6) | ||
| Signs | Directional signs along the way (3/6) | ||
| Experience Required | No experience required (1/6) | ||
| Weather | Weather generally has little impact on safety (1/6) | ||
| Infrastructure | Limited facilities, not all cliffs are fenced (3/6) |
Some more details of this walks Grading
Here is a bit more details explaining grading looking at sections of the walk
Gradient
This whole walk, 1.6km has short steep hills.
Quality of track
Around 850m of this walk follows a clear and well formed track or trail, whilst the remaining 750m follows a formed track, with some branches and other obstacles.
Signs
Around 850m of this walk has directional signs at most intersection, whilst the remaining 750m is clearly signposted.
Experience Required
This whole walk, 1.6km requires no previous bushwalking experience.
weather
This whole walk, 1.6km is not usually affected by severe weather events (that would unexpectedly impact safety and navigation).
Infrastructure
Around 850m of this walk has limited facilities (such as not all cliffs fenced), whilst the remaining 750m is close to useful facilities (such as fenced cliffs and seats).
Similar walks
A list of walks that share part of the track with the Garie Beach to North Era Beach walk.
3.3 km One way
1 hr 45 mins
Hard track
3.9 km One way
2 hrs
Moderate track
11 km One way
4 hrs 30 mins
Hard track
13.5 km Circuit
7 hrs
Hard track
27.4 km One way
2 Days
Hard track
27.4 km One way
2 Days
Hard track
Other Nearby walks
A list of walks that start near the Garie Beach to North Era Beach walk.
7.7 km Return
3 hrs
Hard track
1.3 km Return
45 mins
Moderate track
5 km Circuit
2 hrs 15 mins
Hard track
4.4 km One way
1 hr 45 mins
Hard track
9.2 km Circuit
3 hrs 30 mins
Hard track
4.7 km One way
1 hr 45 mins
Moderate track
11.8 km Return
4 hrs 30 mins
Hard track
12.5 km Circuit
4 hrs 30 mins
Moderate track
8.2 km Circuit
3 hrs 30 mins
Hard track
6 km Return
2 hrs 30 mins
Hard track

4.1 km One way
1 hr 30 mins
Moderate track
8.9 km Return
3 hrs 30 mins
Moderate track
Plan your trip to and from the walk here
The Garie Beach to North Era Beach walk starts and ends at the Garie Beach Car Park (gps: -34.170208, 151.06645)
Your main transport option to Garie Beach Car Park is by;
![]() Car. A park entry fee is required for driving into the park.
Car. A park entry fee is required for driving into the park.
(get details)
Short URL = http://wild.tl/gbtneb
Gallery images
There are other downloads I am still working on.
You will probably need to login to access these — still all free.
* KML (google earth file)
* GPX (GPS file)
Special Maps/ brochures
* A3 topo maps
* PDF with Lands Topo map base
* PDF with arial image (and map overlay)
I wanted to get the main site live first, this extra stuff will come in time.
Happy walking
Matt 🙂
Mt Bass- Winifred Falls
And Walk
Mt Bass- Winifred Falls

2 hrs 30 mins
6.7 km Return
213 m
Hard track
This walk follows Mount Bass Fire Trail, then a bush track, to Winifred Falls. Be prepared to get your feet wet crossing upper Winifred Falls. The Winifred Falls are really nice, and can be complemented by the brilliant side trip down to to South West Arm pools. These pools are a great place for a swim and a bite to eat before returning to the road.


(0km) Int. Bundeena Drive and Mt Bass Trail → Int. Mt Bass Trail and Anice and Winifred Falls Trks
2.6 km
45 mins
2m
-103m
Moderate track
From the intersection, this walk heads along the flat ridge, away from the valley. The trail veers right twice, giving views of Sydney CBD (far to the right). The trail soon turns left, down the hill. The walk then leads right, continuing down the hill into an area of tall vegetation for some time, before coming to a rocky surface followed by the end of the management trail.
Veer right: From the end of the management trail, this walk passes the pink ribbon marker on a branch, heading down the track through the trees. The walk continues for approximately 100m, keeping relatively straight, before coming to the sign marked intersection.
Veer right: From the end of the management trail, this walk passes the pink ribbon marker on a branch, heading down the track through the trees. The walk continues for approximately 100m, keeping relatively straight, before coming to the sign marked intersection.
(2.63km) Int. Mt Bass Trail and Anice and Winifred Falls Trks → Upper Winifred Falls
690 m
17 mins
25m
-81m
Hard track
Turn left: From the intersection, this walk leads in a south-westerly direction, following the sign towards ‘Winifred Falls’. The track descends to a creek and then climbs over the spur to a second creek. From the second creek, the track continues for approximately 50m to descend steeply to the right, down the hill. The track descends steeply to near the falls, where the walk turns left onto a rockshelf leading to the creek and waterfall.
(3.33km) Upper Winifred Falls → South West Arm Pools Trk
40 m
1 mins
0m
-2m
Moderate track
Continue straight: From the falls, this walk crosses the shallows to the other side of the creek, then heads downstream past a grass plant for approximately 10m, to continue to the clearing at the intersection.
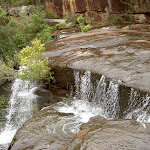
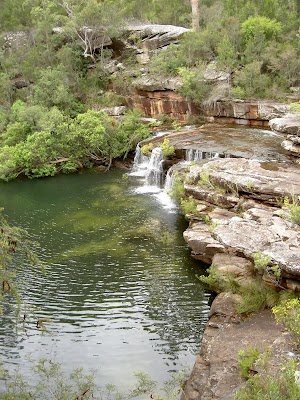
Winifred Falls
Winifred Falls, Royal National Park, is a large a picturesque waterfall created by a large rockshelf, over which pours South West Arm Creek. The waterfall has a large pool at its base which is an ideal place to get your toes wet.
(3.37km) South West Arm Pools Trk → South West Arm Pools
370 m
6 mins
2m
-9m
Hard track
Veer right: From the intersection the track heads north, down stream, leaving the clearing of the intersection down a steep rocky section of track. The track reaches the pool below Winifred Falls within 15m. The track then leads from the pool along the creek line or above the creek line for approximately 300m down stream to a large pool with three large boulders on the left. At the end of this side trip, retrace your steps back to the main walk then Turn right.
Maps for the Mt Bass- Winifred Falls walk
You can download the PDF for this walk to print a map.
These maps below cover the walk and the wider area around the walk, they are worth carrying for safety reasons.
| Port Hacking | 1:25 000 Map Series | 91294N PORT HACKING | NSW-91294N |
| Port Hacking | 1:100 000 Map Series | 9129 PORT HACKING | 9129 |
Cross sectional view of the Mt Bass- Winifred Falls bushwalking track
Analysis and summary of the altitude variation on the Mt Bass- Winifred Falls
Overview of this walks grade – based on the AS 2156.1 – 2001
Under this standard, a walk is graded based on the most difficult section of the walk.
| Length | 6.7 km | ||
| Time | 2 hrs 30 mins | ||
| . | |||
| Grade 4/6 Hard track |
AS 2156.1 | Gradient | Short steep hills (3/6) |
| Quality of track | Rough track, where fallen trees and other obstacles are likely (4/6) | ||
| Signs | Directional signs along the way (3/6) | ||
| Experience Required | Some bushwalking experience recommended (3/6) | ||
| Weather | Weather generally has little impact on safety (1/6) | ||
| Infrastructure | Limited facilities (such as cliffs not fenced, significant creeks not bridged) (4/6) |
Some more details of this walks Grading
Here is a bit more details explaining grading looking at sections of the walk
Gradient
Around 2.7km of this walk has gentle hills with occasional steps, whilst the remaining 690m has short steep hills.
Quality of track
Around 2.7km of this walk follows a formed track, with some branches and other obstacles, whilst the remaining 690m follows a rough track, where fallen trees and other obstacles are likely.
Signs
This whole walk, 3.4km has directional signs at most intersection.
Experience Required
Around 2.7km of this walk requires no previous bushwalking experience, whilst the remaining 690m requires some bushwalking experience.
weather
This whole walk, 3.4km is not usually affected by severe weather events (that would unexpectedly impact safety and navigation).
Infrastructure
Around 2.7km of this walk has limited facilities (such as not all cliffs fenced), whilst the remaining 690m has limited facilities (such as cliffs not fenced, significant creeks not bridged).
Similar walks
A list of walks that share part of the track with the Mt Bass- Winifred Falls walk.
4.4 km One way
2 hrs
Hard track
11 km One way
4 hrs
Hard track
Other Nearby walks
A list of walks that start near the Mt Bass- Winifred Falls walk.
13.3 km One way
5 hrs
Hard track
294 m Return
15 mins
Moderate track
9.7 km Return
3 hrs 30 mins
Hard track
3.8 km Return
1 hr 30 mins
Hard track
11 km Circuit
4 hrs 30 mins
Hard track
7.4 km Return
3 hrs
Moderate track
1.6 km Return
45 mins
Easy track
7.6 km One way
3 hrs 30 mins
Hard track
1.7 km Return
45 mins
Moderate track
10.4 km Circuit
4 hrs
Moderate track
3.1 km Return
1 hr 15 mins
Moderate track
4.1 km One way
1 hr 30 mins
Moderate track
Plan your trip to and from the walk here
The Mt Bass- Winifred Falls walk starts and ends at the Int. Bundeena Drive and Mt Bass Trail (gps: -34.109099, 151.087)
Your main transport option to Int. Bundeena Drive and Mt Bass Trail is by;
![]() Car. There is free parking available.
Car. There is free parking available.
(get details)
Short URL = http://wild.tl/mbwf
Gallery images
There are other downloads I am still working on.
You will probably need to login to access these — still all free.
* KML (google earth file)
* GPX (GPS file)
Special Maps/ brochures
* A3 topo maps
* PDF with Lands Topo map base
* PDF with arial image (and map overlay)
I wanted to get the main site live first, this extra stuff will come in time.
Happy walking
Matt 🙂
Loftus to Winifred Falls
And Walk
Loftus to Winifred Falls

4 hrs
11 km One way
400 m
Hard track
Following well-maintained bush tracks and service trails, this walk descends into the Royal National Park, to a spectacular set of pools and cascading falls on South Western Creek. The Royal National Park Information Centre, on Sir Bertram Stevens Drive, is approximately in the middle of this walk and is a great spot to grab a bite to eat before continuing to the falls. Unfortunately, it is necessary to have a car to get from Winifred Falls out of the park.


(0km) Loftus Station → Int of Princes Hwy and Royal National Park Servicetrail
680 m
12 mins
15m
-10m
Moderate track
From Loftus Station, this walk turns left at the top of the stairs and leads down to Pitt Street. The track turns right on Pitt St, crossing the tram line and the northbound lane of Rawson Ave when safe. The walk turns right then crosses the southbound lanes at the traffic lights. This now heads across the Princes Hwy, this is a very busy road at times and this crossing can be difficult, wait for a good gap and be safe. The walk then turns right and heads alongside the highway for approximately 400m (road to the right) where the walk comes to a clearing and heads towards the dilapidated brown cottage. (If you cross tram line again, you have gone to far along the Princes Highway.)
(0.68km) Int of Princes Hwy and Royal National Park Servicetrail → Top of Honeymoon trail
2 km
33 mins
19m
-19m
Moderate track
Turn left: From the intersection of the management trail and the Princes Hwy, this walk proceeds around the wire fencing (around by the brown cottage is the easiest). On the other side of the cottage, the walk joins up with the management trail and continues south-east. Approximately 50m along this section the track passes another trail going off to the east (left). Continuing past this, the walk joins up with the Royal National Park Tramway lines and heads south along the management trail beside them. After quite some time, the walk passes the tram station, which is quite interesting historically, and 50m later, comes to the National Parks Education Centre car park.
Continue straight: From the top of the car park, this walk heads downhill through the car park towards the buildings (the area office). The walk heads down the grassy strip, keeping the area office to the left. At the bottom of the grassy clearing, the walk comes to the top of the ‘Honeymoon trail’ and information sign.
Continue straight: From the top of the car park, this walk heads downhill through the car park towards the buildings (the area office). The walk heads down the grassy strip, keeping the area office to the left. At the bottom of the grassy clearing, the walk comes to the top of the ‘Honeymoon trail’ and information sign.
(2.67km) Top of Honeymoon track → Reid Park
1 km
23 mins
11m
-123m
Moderate track
Continue straight: From the grassy clearing, this walk follows ‘Honeymoon Track’ sign down the steps into the bush. The track meanders through the bush for a while, until it flattens out slightly before coming into a park. The track turns left and continues to a toilet block.
(3.71km) Int of Honeymoon Track and Reid Park → Royal National Park Information Centre
320 m
7 mins
15m
-10m
Moderate track
Turn right: From the intersection, this walk heads through the park towards the road and bridge. The walk then follows the road over the bridge to continue up the hill. The road quickly turns right and continues up to the Royal National Park Discovery Centre.
(4.03km) Int. Winifred Falls Trk and Sir Bertram Stevens Dr → Sir Bertram Stevens Drive Access Int.
990 m
27 mins
120m
-5m
Hard track
Turn left: From the visitors’ centre, this walk crosses Sir Bertram Stevens Drive to the signposted ‘Winifred Falls Track’[1]. The walk heads up the stairs to a flat area above the road. The track then continues past a pipeline valve, then heads north-east up a sandstone block-formed track. The track continues north-east, swinging to the right, up the hillside. The walk passes a rocky outcrop, then continues to wind up the hill for some time. The track then turns sharply left near the top, and soon comes to a three-way intersection.
(5.02km) Sir Bertram Stevens Drive Access Int. → Warumbul Rd Int.
1.2 km
22 mins
29m
-29m
Moderate track
Continue straight: From the intersection, this walk heads away from the dump, keeping it behind on the right, for approximately 100m. The trail then swings right for approximately 500m down to a creek bed, then rises out again. After approximately 500m, the walk comes to a four-way intersection with an unsealed road, after a gate.
(6.21km) Warumbul Rd → South West Arm Pools Trk
1.4 km
33 mins
5m
-117m
Moderate track
Continue straight: From the intersection at the gate, this walk heads down the hill following the ‘Winifred Falls Fire Trail’ sign. The trail then steeply descends, as the vegetation starts to include more trees. The walk continues to wind down the hill for some time to the flat clearing at the intersection.
(7.63km) South West Arm Pools Trk → South West Arm Pools
370 m
6 mins
2m
-9m
Hard track
Turn left: From the intersection the track heads north, down stream, leaving the clearing of the intersection down a steep rocky section of track. The track reaches the pool below Winifred Falls within 15m. The track then leads from the pool along the creek line or above the creek line for approximately 300m down stream to a large pool with three large boulders on the left. At the end of this side trip, retrace your steps back to the main walk then Veer left.
(7.63km) South West Arm Pools Trk → Int. Mt Bass Trail and Anice and Winifred Falls Trks
740 m
18 mins
83m
-25m
Hard track
Turn right: From the intersection, this walk heads out of the clearing and away from the service trail, heading towards the water, and after approximately 10m, comes to a grass plant. From the grass plant, the track continues for approximately 10m upstream, to then cross the river above the small waterfalls.
Continue straight: From the creek and waterfall, this walk heads onto a rockshelf where the track turns right, heading steeply up the hill. The walk continues up the hill for approximately 50m to a creek. The track then traverses a spur to a second creek. The walk then continues for a short time to a sign marked intersection.
Continue straight: From the creek and waterfall, this walk heads onto a rockshelf where the track turns right, heading steeply up the hill. The walk continues up the hill for approximately 50m to a creek. The track then traverses a spur to a second creek. The walk then continues for a short time to a sign marked intersection.
(8.36km) Int. Mt Bass Trail and Anice and Winifred Falls Trks → End Mount Bass Trail
340 m
6 mins
25m
0m
Moderate track
Turn right: From the intersection, this walk heads up the hill, keeping relatively straight as the bush track climbs gently for approximately 100m to the end of the management trail.
(8.7km) End Mount Bass Trail → Int. Bundeena Drive and Mt Bass Trail
2.3 km
39 mins
78m
-2m
Moderate track
Veer left: From the end of the management trail, this walk heads up the slight hill, along the defined management trail. The trail leads up through an area of tall trees, then veers left to the ridgeline. Approximately 40m of flat is passed, coming to an area with views of Sydney CBD on the left. The trail then continues along the flat ridge, veering left twice as it continues for a little while to the intersection with Bundeena Dr.
Maps for the Loftus to Winifred Falls walk
You can download the PDF for this walk to print a map.
These maps below cover the walk and the wider area around the walk, they are worth carrying for safety reasons.
| Port Hacking | 1:25 000 Map Series | 91294N PORT HACKING | NSW-91294N |
| Port Hacking | 1:100 000 Map Series | 9129 PORT HACKING | 9129 |
Cross sectional view of the Loftus to Winifred Falls bushwalking track

Analysis and summary of the altitude variation on the Loftus to Winifred Falls
Overview of this walks grade – based on the AS 2156.1 – 2001
Under this standard, a walk is graded based on the most difficult section of the walk.
| Length | 11 km | ||
| Time | 4 hrs | ||
| . | |||
| Grade 4/6 Hard track |
AS 2156.1 | Gradient | Short steep hills (3/6) |
| Quality of track | Rough track, where fallen trees and other obstacles are likely (4/6) | ||
| Signs | Directional signs along the way (3/6) | ||
| Experience Required | Some bushwalking experience recommended (3/6) | ||
| Weather | Weather generally has little impact on safety (1/6) | ||
| Infrastructure | Limited facilities (such as cliffs not fenced, significant creeks not bridged) (4/6) |
Some more details of this walks Grading
Here is a bit more details explaining grading looking at sections of the walk
Gradient
5km of this walk has gentle hills with occasional steps and another 5km has short steep hills. The remaining (170m) is flat with no steps.
Quality of track
4.9km of this walk follows a formed track, with some branches and other obstacles and another 3.2km follows a clear and well formed track or trail. Whilst another 1.7km follows a rough track, where fallen trees and other obstacles are likely and the remaining 1.2km follows a smooth and hardened path.
Signs
Around 7km of this walk has directional signs at most intersection, whilst the remaining 4km is clearly signposted.
Experience Required
Around 8km of this walk requires no previous bushwalking experience, whilst the remaining 2.5km requires some bushwalking experience.
weather
This whole walk, 11km is not usually affected by severe weather events (that would unexpectedly impact safety and navigation).
Infrastructure
7km of this walk has limited facilities (such as not all cliffs fenced) and another 3km is close to useful facilities (such as fenced cliffs and seats). The remaining (690m) has limited facilities (such as cliffs not fenced, significant creeks not bridged).
Similar walks
A list of walks that share part of the track with the Loftus to Winifred Falls walk.
4.4 km One way
2 hrs
Hard track
6.7 km Return
2 hrs 30 mins
Hard track
Other Nearby walks
A list of walks that start near the Loftus to Winifred Falls walk.
918 m Return
20 mins
Very easy
2.2 km Return
45 mins
Easy track
2.3 km Circuit
1 hr 15 mins
Hard track

858 m Return
20 mins
Easy track
5 km Return
1 hr 45 mins
Easy track

10.5 km Return
4 hrs
Moderate track

5.8 km One way
2 hrs 30 mins
Hard track
13.1 km One way
4 hrs 30 mins
Hard track

10 km One way
4 hrs 15 mins
Hard track


15 km One way
6 hrs 30 mins
Hard track
11.3 km One way
4 hrs 30 mins
Hard track

5.6 km Return
3 hrs
Moderate track

Plan your trip to and from the walk here
The Loftus to Winifred Falls walk starts at the Loftus Station (gps: -34.045276, 151.05147)
Your transport options to Loftus Station are by;
![]() Train. (get details)
Train. (get details)
![]() Car. There is free parking available.
Car. There is free parking available.
(get details)
The Loftus to Winifred Falls ends at the Int. Bundeena Drive and Mt Bass Trail (gps: -34.109099, 151.087)
Your main transport option to Int. Bundeena Drive and Mt Bass Trail is by;
![]() Car. A park entry fee is required for driving into the park.
Car. A park entry fee is required for driving into the park.
(get details)
Short URL = http://wild.tl/ltwf
Gallery images
There are other downloads I am still working on.
You will probably need to login to access these — still all free.
* KML (google earth file)
* GPX (GPS file)
Special Maps/ brochures
* A3 topo maps
* PDF with Lands Topo map base
* PDF with arial image (and map overlay)
I wanted to get the main site live first, this extra stuff will come in time.
Happy walking
Matt 🙂
Stockyard spur to Garie Beach
And Walk
Stockyard spur to Garie Beach

1 hr 45 mins
3.3 km One way
142 m
Hard track
The walk down Stockyard Spur to Garie Beach is an excellent way to take in coastal views before following the Coastal Track. This is great if you are with a driver who is happy to drop you and wait for you are Garie Beach, or if you can do a car shuffle. You can always just walk back up. There are plenty of opportunities to get your feet wet if you wish to cool down on the walk, and you can see some of the houses built during the depression at North Era and Little Garie.


(0km) Int. Garie Rd and The Squeeze way → The Squeeze way and Stockyard Gully Trk
430 m
9 mins
10m
-22m
Moderate track
From the intersection, this walk heads away from Garie Rd and the gate towards the ‘No parking along this road’ sign and the ‘No Stopping’ signs. The walk then continues for approximately 200m along the relatively flat management trail, before heading downhill. The trail leads to the bottom of a small rise where there is an unmarked intersection with a bush track on the left. There is a round soccer ball-sized rock here.
(0.43km) The Squeeze way and Stockyard Gully Trk → North Era Bush Campground
1.3 km
31 mins
11m
-206m
Hard track
Turn left : From the intersection, this walk heads away from the management trail, winding through the bush for approximately 50m before heading down the hill. The track follows the top of the ridge, winding down among many large rocks for approximately 100m, then continuing south-east down the hill to an area with an open, clear, forest floor. After approximately 100m, the forest floor becomes thick with grasses, and the walk continues through this to an open canopy, which overlooks houses to the right of the ridge. The walk then heads up through the open grass area to the intersection.
Turn left : From the top of the ridge, the walk crosses the headland and open grassy area, down towards the beach (keeping the ocean to the right), coming to a ‘North Era Bush Campground’ sign just before the beach.
Turn left : From the top of the ridge, the walk crosses the headland and open grassy area, down towards the beach (keeping the ocean to the right), coming to a ‘North Era Bush Campground’ sign just before the beach.
North Era camping ground
North Era camping ground, Royal National Park, is a large dune area situated directly behind North Era Beach. This camping spot is popular with surfers, and it also has a toilet and a cleared area to pitch your tent. A maximum of 36 people (12 sites) can camp here, so there is plenty of room for everyone. Open fires are not permitted, you can carry a fuel stove for cooking. A camping permit is required from NPWS before arriving (Phone:(02) 9542 068). Water is often available from the creek (treat before drinking), If dry you can walk to Garie Beach for water, although the water here may also be dried up, during a dry period it is best to carry all your water with you.
(1.73km) North Era Bush Campground → Little Garie
850 m
23 mins
74m
-62m
Moderate track
Continue straight: Keeping the ocean and the coast to the right, the walk heads north across the North Era Bush Campground to the base of the large grassy hill, which it climbs steeply to the top. Upon reaching the top, the walk continues down the other side of the hill, winding down the bush track and wooden steps, until reaching the Little Garie Community Hall at the base of the hill.
(2.57km) Little Garie → Garie Beach Car Park
750 m
20 mins
47m
-59m
Moderate track
Continue straight: From the Little Garie Community Hall, the walk heads down the hill, keeping the sea to the right of the track as it leads into the gully. The walk passes several old cabins as it approaches the bottom, where the track passes a ‘Coast Walk’ sign, providing information on erosion issues in this area. From here, the walk heads between the ocean on the right and the base of the large grassy hill on the left as the track narrows. This continues until arriving in the Garie Beach car park.
Garie Beach
Garie Beach, Royal National Park, is a large, south-east facing, yellow sand beach. The beach is backed by steep headlands and gullies. There is a large car park at the end of Garie Rd for access to the beach. Garie Beach is popular for surfing, patrolled 9am-5pm from December to January. Facilities include toilets, kiosk, picnic tables, cold showers and Surf Life Saving Club. The water from the shower should be treated before drinking, this water comes from a tank and may be unavailable during dry periods. More info.
Maps for the Stockyard spur to Garie Beach walk
You can download the PDF for this walk to print a map.
These maps below cover the walk and the wider area around the walk, they are worth carrying for safety reasons.
| Otford | 1:25 000 Map Series | 91294S OTFORD | NSW-91294S |
| Port Hacking | 1:100 000 Map Series | 9129 PORT HACKING | 9129 |
Cross sectional view of the Stockyard spur to Garie Beach bushwalking track
Analysis and summary of the altitude variation on the Stockyard spur to Garie Beach
Overview of this walks grade – based on the AS 2156.1 – 2001
Under this standard, a walk is graded based on the most difficult section of the walk.
| Length | 3.3 km | ||
| Time | 1 hr 45 mins | ||
| . | |||
| Grade 4/6 Hard track |
AS 2156.1 | Gradient | Short steep hills (3/6) |
| Quality of track | Rough track, where fallen trees and other obstacles are likely (4/6) | ||
| Signs | Minimal directional signs (4/6) | ||
| Experience Required | No experience required (1/6) | ||
| Weather | Weather generally has little impact on safety (1/6) | ||
| Infrastructure | Limited facilities, not all cliffs are fenced (3/6) |
Some more details of this walks Grading
Here is a bit more details explaining grading looking at sections of the walk
Gradient
Around 2.9km of this walk has short steep hills, whilst the remaining 430m has gentle hills with occasional steps.
Quality of track
1.3km of this walk follows a clear and well formed track or trail and another 1.1km follows a rough track, where fallen trees and other obstacles are likely. The remaining (980m) follows a formed track, with some branches and other obstacles.
Signs
1.5km of this walk has directional signs at most intersection and another 1.1km has minimal directional signs. The remaining (750m) is clearly signposted.
Experience Required
This whole walk, 3.3km requires no previous bushwalking experience.
weather
This whole walk, 3.3km is not usually affected by severe weather events (that would unexpectedly impact safety and navigation).
Infrastructure
Around 2.6km of this walk has limited facilities (such as not all cliffs fenced), whilst the remaining 750m is close to useful facilities (such as fenced cliffs and seats).
Similar walks
A list of walks that share part of the track with the Stockyard spur to Garie Beach walk.
3.2 km Return
2 hrs
Moderate track
3.9 km One way
2 hrs
Moderate track
5 km Circuit
2 hrs 15 mins
Hard track
11 km One way
4 hrs 30 mins
Hard track
13.5 km Circuit
7 hrs
Hard track
27.4 km One way
2 Days
Hard track
27.4 km One way
2 Days
Hard track
Other Nearby walks
A list of walks that start near the Stockyard spur to Garie Beach walk.
7.7 km Return
3 hrs
Hard track
1.3 km Return
45 mins
Moderate track
4.4 km One way
1 hr 45 mins
Hard track
9.2 km Circuit
3 hrs 30 mins
Hard track
8.2 km Circuit
3 hrs 30 mins
Hard track
6 km Return
2 hrs 30 mins
Hard track
4.7 km One way
1 hr 45 mins
Moderate track
11.8 km Return
4 hrs 30 mins
Hard track
12.5 km Circuit
4 hrs 30 mins
Moderate track
8.9 km Return
3 hrs 30 mins
Moderate track
9.7 km One way
3 hrs 45 mins
Moderate track
5.1 km Return
2 hrs
Hard track
Plan your trip to and from the walk here
The Stockyard spur to Garie Beach walk starts at the Int. Garie Rd and The Squeeze way (gps: -34.170776, 151.05058)
Your main transport option to Int. Garie Rd and The Squeeze way is by;
![]() Car. A park entry fee is required for driving into the park.
Car. A park entry fee is required for driving into the park.
(get details)
The Stockyard spur to Garie Beach ends at the Garie Beach Car Park (gps: -34.170208, 151.06645)
Your main transport option to Garie Beach Car Park is by;
![]() Car. A park entry fee is required for driving into the park.
Car. A park entry fee is required for driving into the park.
(get details)
Short URL = http://wild.tl/sstgb
Gallery images
There are other downloads I am still working on.
You will probably need to login to access these — still all free.
* KML (google earth file)
* GPX (GPS file)
Special Maps/ brochures
* A3 topo maps
* PDF with Lands Topo map base
* PDF with arial image (and map overlay)
I wanted to get the main site live first, this extra stuff will come in time.
Happy walking
Matt 🙂
Bundeena to Jibbon Head Circuit
And Walk
Bundeena to Jibbon Head Circuit

2 hrs 30 mins
6.8 km Circuit
139 m
Moderate track
On this loop walk you will enjoy some grand ocean views, a few secluded beaches, rock shelves and some Aboriginal engravings. The walk starts in the community of Bundeena and follows the roads to Jibbon Beach then along the track to Jibbon Head and Shelley beach, then a long stretch of sandy management trail through the heath. The walk also describes a side trip to Bundeena Lookout.


Bundeena
Bundeena is a small township at the northern end of Royal National Park and the southern side of the entrance to Port Hacking. The town can be accessed by car or ferry. There are a few B&B’s and other accommodation options and a number of cafes to choose from. Bundeena has a mixed atmosphere, partly a beach holiday community but also home to some permanent residents. There are two main beaches – Hordens Beach to the west and Jibbon Beach to the east. Both are nice beaches inside Port Hacking. More info.
(0km) Bundeena Ferry Wharf → Corner of Loftus and Neil Streets
940 m
18 mins
29m
-18m
Very easy
From the Bundeena Wharf at the end of Brighton St, this walk follows the road up the hill to the intersection at the car park. The walk turns left onto Loftus Street and heads up the hill, past Tom Jones Way and Beach St. Following Loftus St, the road bends right and then turns left (passing the ‘no entry’ traffic signs), walking against the flow of traffic on this one-way section of Loftus St. The walk comes to a footpath at the intersection with Neil Street.
(0.94km) Corner of Loftus and Neil Streets → Northern end of Jibbon Beach
750 m
12 mins
2m
-14m
Easy track
Continue straight: From the corner of Neil and Loftus Streets, this walk heads down the footpath between the houses and onto the end of Jibbon Beach. From here, the walk follows the beach past the large ‘Royal National Park’ sign and, after several hundred metres, comes to an intersection and a large green sign saying ‘Jibbon Loop Track’[1], approximately 90m from the end of the beach.
Jibbon Beach
Jibbon Beach is in the Royal National Park, just east of Bundeena. The yellow sand, crescent-shaped beach is about 800m long and looks north across the entrance to Port Hacking. The beach is in a bay that forms part of a popular harbour for sailing boats. There is a rock shelf at either end of the beach. From the north-eastern end of the beach, there is a track leading to the Jibbon Head Aboriginal engravings site and Little Jibbon Beach. There are no patrols or other facilities at this beach.
(1.69km) Northern end of Jibbon Beach → Little Jibbon Beach intersection
490 m
9 mins
9m
-6m
Moderate track
Continue straight: From the intersection, this walk follows the ‘Jibbon Head’ sign[2] about 100m to the end of the beach (keeping the water to the left). The track then steps up a few rocks and turns right (away from the water), heading through a grassy clearing and then through a tunnel formed by the thick vegetation. The track soon emerges on an unfenced rock platform with great views across the water to Cronulla. Here, the walk heads back into the bush to cross a gully (with an informal track leading left to Little Jibbon Beach). The track then climbs out of the gully to a smaller rock platform and intersection marked with a green metal pole.
Little Jibbon Beach
Little Jibbon Beach is found just north of Jibbon Beach in the Royal National Park. The small beach can be accessed via the Jibbon Head track. This north-facing beach has great views across Port Hacking towards Cronulla. This is not a nudest beach (as some believe) – If you see nudest bathers, they can be reported by calling Crime Stoppers on 131 444.
(2.18km) Little Jibbon Beach intersection → Jibbon Head Aboriginal Engravings
40 m
1 mins
3m
-1m
Easy track
Turn right: From the intersection, this walk heads directly away from the water and cliff edge, following the track into the thick bush. The track soon leads to a large clearing and rock platform with several Aboriginal engravings – please take care not to step on or near the engravings. At the end of this side trip, retrace your steps back to the main walk then Veer right.
Jibbon Head Aboriginal Engravings
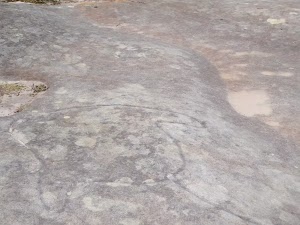
These Aboriginal engravings are found on the western side of Jibbon Head, just above little Jibbon Beach. The large rock shelf has a number of large engraving of both marine and land animals. Most are in good condition – the whale is particularly large, so you will need to stand right back to see it. Take care not to walk on the engravings – lets preserve this site for many generations to come.
(2.18km) Little Jibbon Beach intersection → Jibbon Head
240 m
4 mins
5m
-8m
Moderate track
Turn left: From the intersection, this walk follows the track along the top of the cliff, keeping the water to the left (and ahead). The track soon heads away from the cliff (and water view), passing through the dense bush for about 150m, and then emerges on a long rock platform with views across the water to Cronulla and north to Botany Bay National Park. Here, the walk turns right to follows a track back into the bush, marked with a green post. The track leads up some steps to a large rocky area and a ‘Jibbon Head’ signpost[3].
Jibbon Head
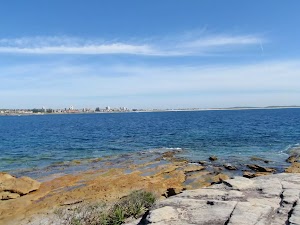
Jibbon Head is in Royal National Park, and is the southern headland forming the entrance to Port Hacking. The headland is home to the Jibbon Aboriginal engravings site. The view from Jibbon Head looks across the port to Cronulla Beach and Botany Bay National Park.
(2.42km) Jibbon Head → Shelley Beach
570 m
10 mins
14m
-10m
Moderate track
Continue straight: From Jibbon Head, this walk follows the ‘Shelley Beach’ sign[4] , keeping the water to the left. The track weaves in and out of the scrub as it follows the coastline until heading down to the grassy area at the top of Shelley Beach (marked with a green pole).
Shelley Beach
Shelley Beach is a sandy and rocky beach, south on the east side of Jibbon Headland, near Bundeena. The beach is in a small bay looking east. There is sand at the upper section of the beach and a rock platform leading onto the water. The dense heath is in clumps at the top of the beach, providing some shade. There is no life saving service or any other facilities at this beach.
(2.99km) Shelley Beach → Int of Jibbon Loop and Coastal Walk tracks
20 m
1 mins
2m
0m
Easy track
Turn right: From Shelley Beach, this walk heads up the hill away from the water to the green signpost, visible up the hill. The signpost is found in a grassy clearing and has a number of signs including one pointing back to ‘Shelley Beach’[5].
(3.01km) Shelley Beach Int → Int of Jibbon Head and Beachcomber Rd Service Trails
2.1 km
39 mins
55m
-21m
Moderate track
Turn left: From the intersection, this walk follows the ‘Bundeena via Coast Track’ arrow[6] along the wide trail. The sandy trail winds uphill through the dense heath. The walk continues along this trail for quite some time, as it turns further inland. At the end of the trail, the walk comes to a ‘T’ intersection with the Beachcomber Avenue management trail.
(5.14km) Int of Jibbon Head and Beachcomber Rd Service Trails → Bundeena Lookout
760 m
14 mins
12m
-27m
Moderate track
Turn left : From the intersection, this walk follows the asphalt management trail heading towards the green signposts nearby, where it comes to the signposted intersection of the ‘Coast Track’[7].
Turn left: From the intersection, the walk follows the ‘Coast Track’ signpost along the wide, sandy bush track as it winds through the short, thick scrub for a while before arriving at the coast, where there are great views across the South Pacific Ocean.
At the end of this side trip, retrace your steps back to the main walk then Continue straight.
Bundeena Lookout
This unfenced, informal lookout is perched high on the cliffs, looking east over the South Pacific Ocean. The lookout is not signposted nor officially named, but provides great view south along the escarpment. Cliff edge may be unstable and fragile – keep a safe distance.
(5.14km) Int of Jibbon Head and Beachcomber Rd Service Trails → End of Beachcomber Av
130 m
2 mins
2m
-2m
Moderate track
Turn right: From the intersection, this walk heads north around a sweeping left-hand bend along the sealed management trail. Soon, the trail leads past a track (on the right) then passes around a locked gate at the end of of Beachcomber Ave and a ‘Coast Walk’ information sign[8].
(5.28km) End of Beachcomber Av → Bundeena Ferry Wharf
1.6 km
30 mins
21m
-61m
Easy track
Continue straight: From the end of Beachcomber Ave, this walk heads along Beachcomber Ave north-west and gradually around to the north, until turning left into Scarbourough St. The first right is taken into Bournemouth St, then left into Loftus St. The walk continues along this road until turning right into Brighton Rd. Bundeena Ferry is located at the end of Brighton St.
Maps for the Bundeena to Jibbon Head Circuit walk
You can download the PDF for this walk to print a map.
These maps below cover the walk and the wider area around the walk, they are worth carrying for safety reasons.
| Port Hacking | 1:25 000 Map Series | 91294N PORT HACKING | NSW-91294N |
| Port Hacking | 1:100 000 Map Series | 9129 PORT HACKING | 9129 |
Cross sectional view of the Bundeena to Jibbon Head Circuit bushwalking track
Analysis and summary of the altitude variation on the Bundeena to Jibbon Head Circuit
Overview of this walks grade – based on the AS 2156.1 – 2001
Under this standard, a walk is graded based on the most difficult section of the walk.
| Length | 6.8 km | ||
| Time | 2 hrs 30 mins | ||
| . | |||
| Grade 3/6 Moderate track |
AS 2156.1 | Gradient | Short steep hills (3/6) |
| Quality of track | Formed track, with some branches and other obstacles (3/6) | ||
| Signs | Directional signs along the way (3/6) | ||
| Experience Required | Some bushwalking experience recommended (3/6) | ||
| Weather | Weather generally has little impact on safety (1/6) | ||
| Infrastructure | Limited facilities, not all cliffs are fenced (3/6) |
Some more details of this walks Grading
Here is a bit more details explaining grading looking at sections of the walk
Gradient
2.7km of this walk has short steep hills and another 2.4km has gentle hills with occasional steps. The remaining (1.7km) is flat with no steps.
Quality of track
3.8km of this walk follows a clear and well formed track or trail and another 2.5km follows a smooth and hardened path. The remaining (570m) follows a formed track, with some branches and other obstacles.
Signs
Around 4.7km of this walk is clearly signposted, whilst the remaining 2.1km has directional signs at most intersection.
Experience Required
Around 4km of this walk requires no previous bushwalking experience, whilst the remaining 2.9km requires some bushwalking experience.
weather
This whole walk, 7km is not usually affected by severe weather events (that would unexpectedly impact safety and navigation).
Infrastructure
Around 3.8km of this walk is close to useful facilities (such as fenced cliffs and seats), whilst the remaining 3km has limited facilities (such as not all cliffs fenced).
Similar walks
A list of walks that share part of the track with the Bundeena to Jibbon Head Circuit walk.
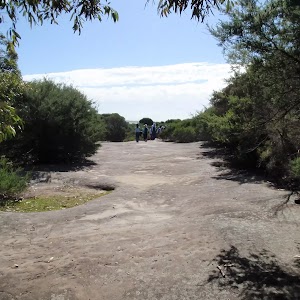
2.6 km Return
45 mins
Moderate track
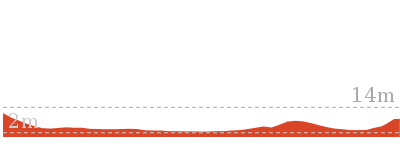
5.1 km Circuit
1 hr 45 mins
Moderate track
10.8 km Circuit
3 hrs 20 mins
Moderate track
12.7 km Return
4 hrs 30 mins
Moderate track
14 km Return
5 hrs
Moderate track
27.4 km One way
2 Days
Hard track
27.4 km One way
2 Days
Hard track
Other Nearby walks
A list of walks that start near the Bundeena to Jibbon Head Circuit walk.
13.1 km One way
4 hrs 30 mins
Hard track
9.7 km Return
3 hrs 30 mins
Hard track
3.8 km Return
1 hr 30 mins
Hard track
11 km Circuit
4 hrs 30 mins
Hard track
4.4 km One way
2 hrs
Hard track
858 m Return
20 mins
Easy track
5 km Return
1 hr 45 mins
Easy track
10.5 km Return
4 hrs
Moderate track
2.3 km Circuit
1 hr 15 mins
Hard track
2.2 km Return
45 mins
Easy track
6.7 km Return
2 hrs 30 mins
Hard track
13.3 km One way
5 hrs
Hard track
Plan your trip to and from the walk here
The Bundeena to Jibbon Head Circuit walk starts and ends at the Bundeena Ferry Wharf (gps: -34.082706, 151.15107)
Your transport options to Bundeena Ferry Wharf are by;
![]() Ferry. (get details)
Ferry. (get details)
![]() Car. A park entry fee is required for driving into the park.
Car. A park entry fee is required for driving into the park.
(get details)
Short URL = http://wild.tl/btjhc
Gallery images
There are other downloads I am still working on.
You will probably need to login to access these — still all free.
* KML (google earth file)
* GPX (GPS file)
Special Maps/ brochures
* A3 topo maps
* PDF with Lands Topo map base
* PDF with arial image (and map overlay)
I wanted to get the main site live first, this extra stuff will come in time.
Happy walking
Matt 🙂
Garie Beach to Helensburgh (The Burgh Track)

4 hrs 30 mins
11 km One way
664 m
Hard track
This walk has a great mixture of ocean cliffs, with fantastic views, and beautiful forest. The walk follows the well maintained Burgh Track, passing great views of the ocean and the cliffs, before turning inland and exploring some eucalypt forest on the way to Helensburgh. The environment and views near Lady Wakehurst Dr are incredibly special as the track winds its way through a shrouded eucalypt forest.
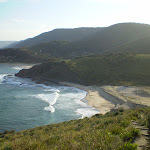


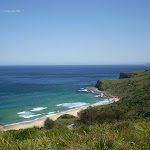


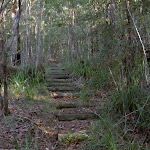
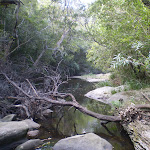


North Era camping ground
North Era camping ground, Royal National Park, is a large dune area situated directly behind North Era Beach. This camping spot is popular with surfers, and it also has a toilet and a cleared area to pitch your tent. A maximum of 36 people (12 sites) can camp here, so there is plenty of room for everyone. Open fires are not permitted, you can carry a fuel stove for cooking. A camping permit is required from NPWS before arriving (Phone:(02) 9542 068). Water is often available from the creek (treat before drinking), If dry you can walk to Garie Beach for water, although the water here may also be dried up, during a dry period it is best to carry all your water with you.
(0km) Garie Beach Car Park → Little Garie
750 m
20 mins
59m
-47m
Moderate track
From the Garie Beach car park, the walk follows the sign to ‘North Era’, keeping the sea to the left. This track follows the base of the large grassy hill between the rocks and the ocean, to the Little Garie cabins and up past the Little Garie Community Hall.
(0.75km) Little Garie → North Era Bush Campground
850 m
23 mins
62m
-74m
Moderate track
Continue straight: From the community hall in Little Garie, the walk heads steeply up the hill, following the track to the south-west. To prevent erosion of the hill, wooden steps have been installed. From the top of the ridge, the track continues down the other side, keeping the ocean on the left while winding down into North Era Bush Campground.
(1.6km) North Era Bush Campground → Int of Burgh Ridge Track and Era Track (East)
910 m
20 mins
59m
-20m
Moderate track
Continue straight: From the North Era Bush Campground, the walk heads up the grassy hill, keeping the ocean to the left. Just before the buildings, the walk comes to an intersection with a track on the right (which heads into the trees).
Continue straight: From the top of the ridge, the walk heads down the hill, keeping the ocean to the left as it winds down between the cabins to the beach at the bottom. From here, the walk continues around the back of the beach following the coast, and up between the houses to the large clearing before the top of the hill. Here, the walk comes to an intersection with two rough bush tracks towards the top of the hill.
Continue straight: From the top of the ridge, the walk heads down the hill, keeping the ocean to the left as it winds down between the cabins to the beach at the bottom. From here, the walk continues around the back of the beach following the coast, and up between the houses to the large clearing before the top of the hill. Here, the walk comes to an intersection with two rough bush tracks towards the top of the hill.
(2.51km) Int of Burgh Ridge Track and Era Track (East) → The Squeeze Way and Burgh Ridge track
1.3 km
32 mins
181m
-13m
Moderate track
Veer right: From the intersection, this walk heads up the hill and away from the ocean, winding through the tall grass to the top of the hill, where it comes to a ‘T’ intersection with the track at the top.
Veer right: From the intersection, this walk follows the bush track heading up the hill and away from the ocean, towards the thick forest at the top of the ridge. The track winds up the long hill to the treeline, where it continues up through the forest, climbing to the top of the long hill where it gradually flattens out and comes to the intersection of the ‘Squeeze Way’ service trail at the end of the Garrawarra Farm car park.
Veer right: From the intersection, this walk follows the bush track heading up the hill and away from the ocean, towards the thick forest at the top of the ridge. The track winds up the long hill to the treeline, where it continues up through the forest, climbing to the top of the long hill where it gradually flattens out and comes to the intersection of the ‘Squeeze Way’ service trail at the end of the Garrawarra Farm car park.
(3.8km) The Squeeze Way and Burgh Ridge track → Int of Burgh and Bola Heights Tracks
330 m
6 mins
5m
-10m
Moderate track
Continue straight: From the intersection, this walk heads across the car park, following the right-hand side for a short while before it comes to the signposted intersection of ‘The Burgh Track’[2], before reaching the paddock.
Continue straight: From the ‘Burgh Track’ sign, this walk follows the sign away from the car park, keeping the paddock to the left. The track heads into the dense bushland, crossing a small creek and continuing along for a short while before coming to the intersection with the unnamed management trail.
Continue straight: From the ‘Burgh Track’ sign, this walk follows the sign away from the car park, keeping the paddock to the left. The track heads into the dense bushland, crossing a small creek and continuing along for a short while before coming to the intersection with the unnamed management trail.
(4.13km) Int of Burgh Track and Bola Heights Trail → Int of Lady Wakehurst Drive and Burgh Track
1.3 km
29 mins
11m
-163m
Moderate track
Continue straight: From the intersection, this walk follows the bush track, heading west through the bush and away from the service trail. The track winds through the dense scrub for a short while, before starting to drop down a long hill, which gradually steepens as it continues down the scattered wooden steps. At the bottom, the walk comes to the intersection with Lady Wakehurst Drive.
(5.47km) Int of Lady Wakehurst Drive and Burgh Track → Int of Burgh and Hacking River Tracks
890 m
19 mins
48m
-18m
Moderate track
Continue straight: From the intersection, this walk heads north-west along the bush track, away from Lady Wakehurst Drive. The track soon passes two signs saying ‘Burgh Track’, following the one that also points to ‘Helensburgh’, passing two large boulders. The track soon tends downhill, following one of the tributaries of the Hacking River. The walk crosses the creek using the boulders as stepping stones. After a short climb up the bank, the track continues slightly further alongside the creek to an old disused management trail, marked by several signs pointing the way to ‘Helensburgh’. At this point, the track turns and leads up the hillside to an intersection with the Hacking management trail, marked by a small trailmarker signpost.
(6.36km) Intersection of Hacking River Firetrail and Burgh Track → End of Halls Rd
3.5 km
1 hr 19 mins
214m
-114m
Hard track
Turn sharp right: From the intersection, this walk heads north along the management trail. The track undulates as it winds its way around the hill, tending west. Gradually, as the walk turns to the west, the track begins to rise steeply. The track goes up to the ridgeline and then flattens out for some time. The trail comes to an intersection and large fenced-in clearing (a tip), marked by a large sign saying ‘Royal National Park’. Here the walk turns right to follow the fence for just shy of 500m before following a short track to the end of Halls Road.
(9.83km) End of Halls Rd → Helensburgh Railway Station
1.2 km
24 mins
25m
-69m
Moderate track
Turn left: From the end of Halls Rd, this walk heads south along the road, immediately passing Gardiner Pl on the right. After a while, the walk comes to a ‘T’ intersection with Parkes St. The walk turns right onto Parkes St, heading downhill along the footpath until reaching Tunnel Rd (signposted), opposite a ‘Helensburgh’ Station sign. The walk turns right and goes along Wilsons Creek Rd for a short while before turning left and taking the the steps down to Helensburgh Railway Station.
Maps for the Garie Beach to Helensburgh (The Burgh Track) walk
You can download the PDF for this walk to print a map.
These maps below cover the walk and the wider area around the walk, they are worth carrying for safety reasons.
| Otford | 1:25 000 Map Series | 91294S OTFORD | NSW-91294S |
| Appin | 1:25 000 Map Series | 90291S APPIN | NSW-90291S |
| Campbelltown | 1:50 000 Map Series | 90291 CAMPBELLTOWN | CW-90291 |
| Port Hacking | 1:100 000 Map Series | 9129 PORT HACKING | 9129 |
| Wollongong | 1:100 000 Map Series | 9029 WOLLONGONG | 9029 |
Cross sectional view of the Garie Beach to Helensburgh (The Burgh Track) bushwalking track
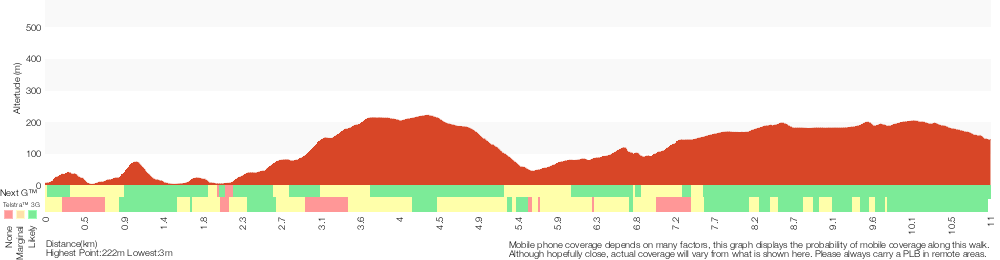
Analysis and summary of the altitude variation on the Garie Beach to Helensburgh (The Burgh Track)
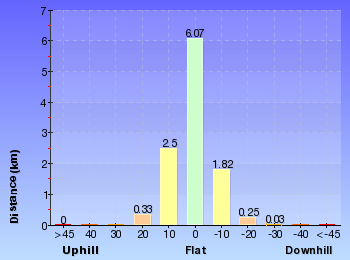
Overview of this walks grade – based on the AS 2156.1 – 2001
Under this standard, a walk is graded based on the most difficult section of the walk.
| Length | 11 km | ||
| Time | 4 hrs 30 mins | ||
| . | |||
| Grade 4/6 Hard track |
AS 2156.1 | Gradient | Short steep hills (3/6) |
| Quality of track | Formed track, with some branches and other obstacles (3/6) | ||
| Signs | Directional signs along the way (3/6) | ||
| Experience Required | Some bushwalking experience recommended (3/6) | ||
| Weather | Weather generally has little impact on safety (1/6) | ||
| Infrastructure | Limited facilities (such as cliffs not fenced, significant creeks not bridged) (4/6) |
Some more details of this walks Grading
Here is a bit more details explaining grading looking at sections of the walk
Gradient
11km of this walk has short steep hills and another 250m has gentle hills with occasional steps. The remaining (85m) is flat with no steps.
Quality of track
Around 7km of this walk follows a clear and well formed track or trail, whilst the remaining 3.8km follows a formed track, with some branches and other obstacles.
Signs
Around 8km of this walk has directional signs at most intersection, whilst the remaining 3.2km is clearly signposted.
Experience Required
Around 7km of this walk requires no previous bushwalking experience, whilst the remaining 3.8km requires some bushwalking experience.
weather
This whole walk, 11km is not usually affected by severe weather events (that would unexpectedly impact safety and navigation).
Infrastructure
7km of this walk has limited facilities (such as not all cliffs fenced) and another 3.5km has limited facilities (such as cliffs not fenced, significant creeks not bridged). The remaining (840m) is close to useful facilities (such as fenced cliffs and seats).
Similar walks
A list of walks that share part of the track with the Garie Beach to Helensburgh (The Burgh Track) walk.
3.2 km Return
2 hrs
Moderate track
3.3 km One way
1 hr 45 mins
Hard track
3.9 km One way
2 hrs
Moderate track
5 km Circuit
2 hrs 15 mins
Hard track
6 km Return
2 hrs 30 mins
Hard track
8.2 km Circuit
3 hrs 30 mins
Hard track
12.9 km One way
5 hrs 15 mins
Hard track
13.4 km Circuit
6 hrs
Hard track
13.5 km Circuit
7 hrs
Hard track
27.4 km One way
2 Days
Hard track
27.4 km One way
2 Days
Hard track
Other Nearby walks
A list of walks that start near the Garie Beach to Helensburgh (The Burgh Track) walk.
7.7 km Return
3 hrs
Hard track
1.3 km Return
45 mins
Moderate track
4.4 km One way
1 hr 45 mins
Hard track
9.2 km Circuit
3 hrs 30 mins
Hard track
4.7 km One way
1 hr 45 mins
Moderate track
11.8 km Return
4 hrs 30 mins
Hard track
12.5 km Circuit
4 hrs 30 mins
Moderate track
4.1 km One way
1 hr 30 mins
Moderate track
8.9 km Return
3 hrs 30 mins
Moderate track
9.7 km One way
3 hrs 45 mins
Moderate track
5.1 km Return
2 hrs
Hard track
4.4 km Circuit
1 hr 45 mins
Moderate track
Plan your trip to and from the walk here
The Garie Beach to Helensburgh (The Burgh Track) walk starts at the Garie Beach Car Park (gps: -34.170208, 151.06645)
Your main transport option to Garie Beach Car Park is by;
![]() Car. A park entry fee is required for driving into the park.
Car. A park entry fee is required for driving into the park.
(get details)
The Garie Beach to Helensburgh (The Burgh Track) ends at the Helensburgh Railway Station (gps: -34.176925, 150.99472)
Your transport options to Helensburgh Railway Station are by;
![]() Train. (get details)
Train. (get details)
![]() Car. There is free parking available.
Car. There is free parking available.
(get details)
Short URL = http://wild.tl/gbthbt
Gallery images
There are other downloads I am still working on.
You will probably need to login to access these — still all free.
* KML (google earth file)
* GPX (GPS file)
Special Maps/ brochures
* A3 topo maps
* PDF with Lands Topo map base
* PDF with arial image (and map overlay)
I wanted to get the main site live first, this extra stuff will come in time.
Happy walking
Matt 🙂
Deer Pools
And Walk
Deer Pools

1 hr 30 mins
3.8 km Return
109 m
Hard track
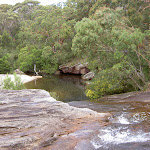
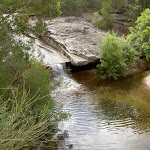

(0km) Int. Marley Trk and Bundeena Drive → Deer Pools Clearing
1.9 km
38 mins
13m
-96m
Hard track
From the car park on the northern side of Bundeena Drive (1.7km east of Mainbar Rd), this walk crosses the road and heads into the bush between the two posts, following the arrow. Soon the track pass the ‘Marley Track’ sign and starts to head downhill. The track continues past the old concrete pipe (with white spray-painted arrows). The track passes a couple of rock platforms, but generally the track is narrow as it winds down the hill. Near Deer Pools, there is a clearing on the left as the track tends right, towards the waterfall. The track passes over the top of the waterfall to head up to a clearing on the other side.
Deer Pool
Deer Pool, Royal National Park, is a small and picturesque set of falls that run into a pool with a sandy bank. The waterfall is fed by Marley Creek which continues its journey into Marley Lagoon, behind Big Marley Beach. Royal National Park was once home to many deer, who used to frequent these pools. This is a relaxing spot on a warm day, with the opportunity for a dip or a gentle massage in the cascade. Although a sign suggests camping is permitted by permit, permits are not issued for camping here.
Maps for the Deer Pools walk
You can download the PDF for this walk to print a map.
These maps below cover the walk and the wider area around the walk, they are worth carrying for safety reasons.
| Port Hacking | 1:25 000 Map Series | 91294N PORT HACKING | NSW-91294N |
| Port Hacking | 1:100 000 Map Series | 9129 PORT HACKING | 9129 |
Cross sectional view of the Deer Pools bushwalking track
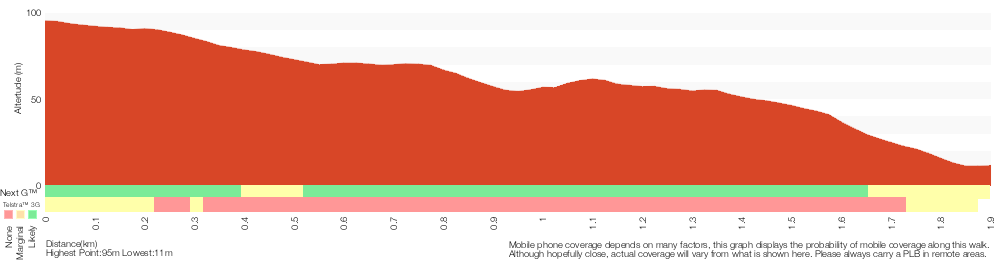
Analysis and summary of the altitude variation on the Deer Pools
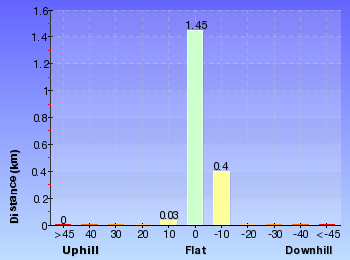
Overview of this walks grade – based on the AS 2156.1 – 2001
Under this standard, a walk is graded based on the most difficult section of the walk.
| Length | 3.8 km | ||
| Time | 1 hr 30 mins | ||
| . | |||
| Grade 4/6 Hard track |
AS 2156.1 | Gradient | Short steep hills (3/6) |
| Quality of track | Formed track, with some branches and other obstacles (3/6) | ||
| Signs | Minimal directional signs (4/6) | ||
| Experience Required | No experience required (1/6) | ||
| Weather | Storms may impact on navigation and safety (3/6) | ||
| Infrastructure | Limited facilities (such as cliffs not fenced, significant creeks not bridged) (4/6) |
Some more details of this walks Grading
Here is a bit more details explaining grading looking at sections of the walk
Gradient
This whole walk, 1.9km has short steep hills.
Quality of track
This whole walk, 1.9km follows a formed track, with some branches and other obstacles.
Signs
This whole walk, 1.9km has minimal directional signs.
Experience Required
This whole walk, 1.9km requires no previous bushwalking experience.
weather
This whole walk, 1.9km is affected by storms that may impact your navigation and safety.
Infrastructure
This whole walk, 1.9km has limited facilities (such as cliffs not fenced, significant creeks not bridged).
Similar walks
A list of walks that share part of the track with the Deer Pools walk.
9.7 km Return
3 hrs 30 mins
Hard track
11 km Circuit
4 hrs 30 mins
Hard track
Other Nearby walks
A list of walks that start near the Deer Pools walk.
6.7 km Return
2 hrs 30 mins
Hard track
13.3 km One way
5 hrs
Hard track
7.4 km Return
3 hrs
Moderate track
1.6 km Return
45 mins
Easy track
7.6 km One way
3 hrs 30 mins
Hard track
1.7 km Return
45 mins
Moderate track
10.4 km Circuit
4 hrs
Moderate track
3.1 km Return
1 hr 15 mins
Moderate track
294 m Return
15 mins
Moderate track
6.8 km Circuit
2 hrs 30 mins
Moderate track
5.1 km Circuit
1 hr 45 mins
Moderate track
14 km Return
5 hrs
Moderate track
Plan your trip to and from the walk here
The Deer Pools walk starts and ends at the Int. Marley Trk and Bundeena Drive (gps: -34.103046, 151.11575)
Your main transport option to Int. Marley Trk and Bundeena Drive is by;
![]() Car. There is free parking available.
Car. There is free parking available.
(get details)
Short URL = http://wild.tl/14
Gallery images
There are other downloads I am still working on.
You will probably need to login to access these — still all free.
* KML (google earth file)
* GPX (GPS file)
Special Maps/ brochures
* A3 topo maps
* PDF with Lands Topo map base
* PDF with arial image (and map overlay)
I wanted to get the main site live first, this extra stuff will come in time.
Happy walking
Matt 🙂
Comments